Setup guide
Codofaz Shipping Bar, start to finish
Every screen and every setting, with a screenshot beside it. Most stores are live in about five minutes. Click any screenshot to see it full size.
Part 1
Getting started
Before you start
The bar shows shoppers how close they are to free shipping. It does not change what they pay. Free shipping itself comes from Shopify, so set that up first, using the same amount you will give the bar:
- a free shipping rate with a minimum order price, in Settings → Shipping and delivery, or
- a free shipping discount, in Discounts.
The app's Home page links to both, and reminds you if you forget.
1 Install the app
Open Codofaz Shipping Bar on the Shopify App Store and select Install. Shopify asks you to approve one permission, read themes, which lets the app check whether the bar is switched on in your theme. The app never edits your theme.
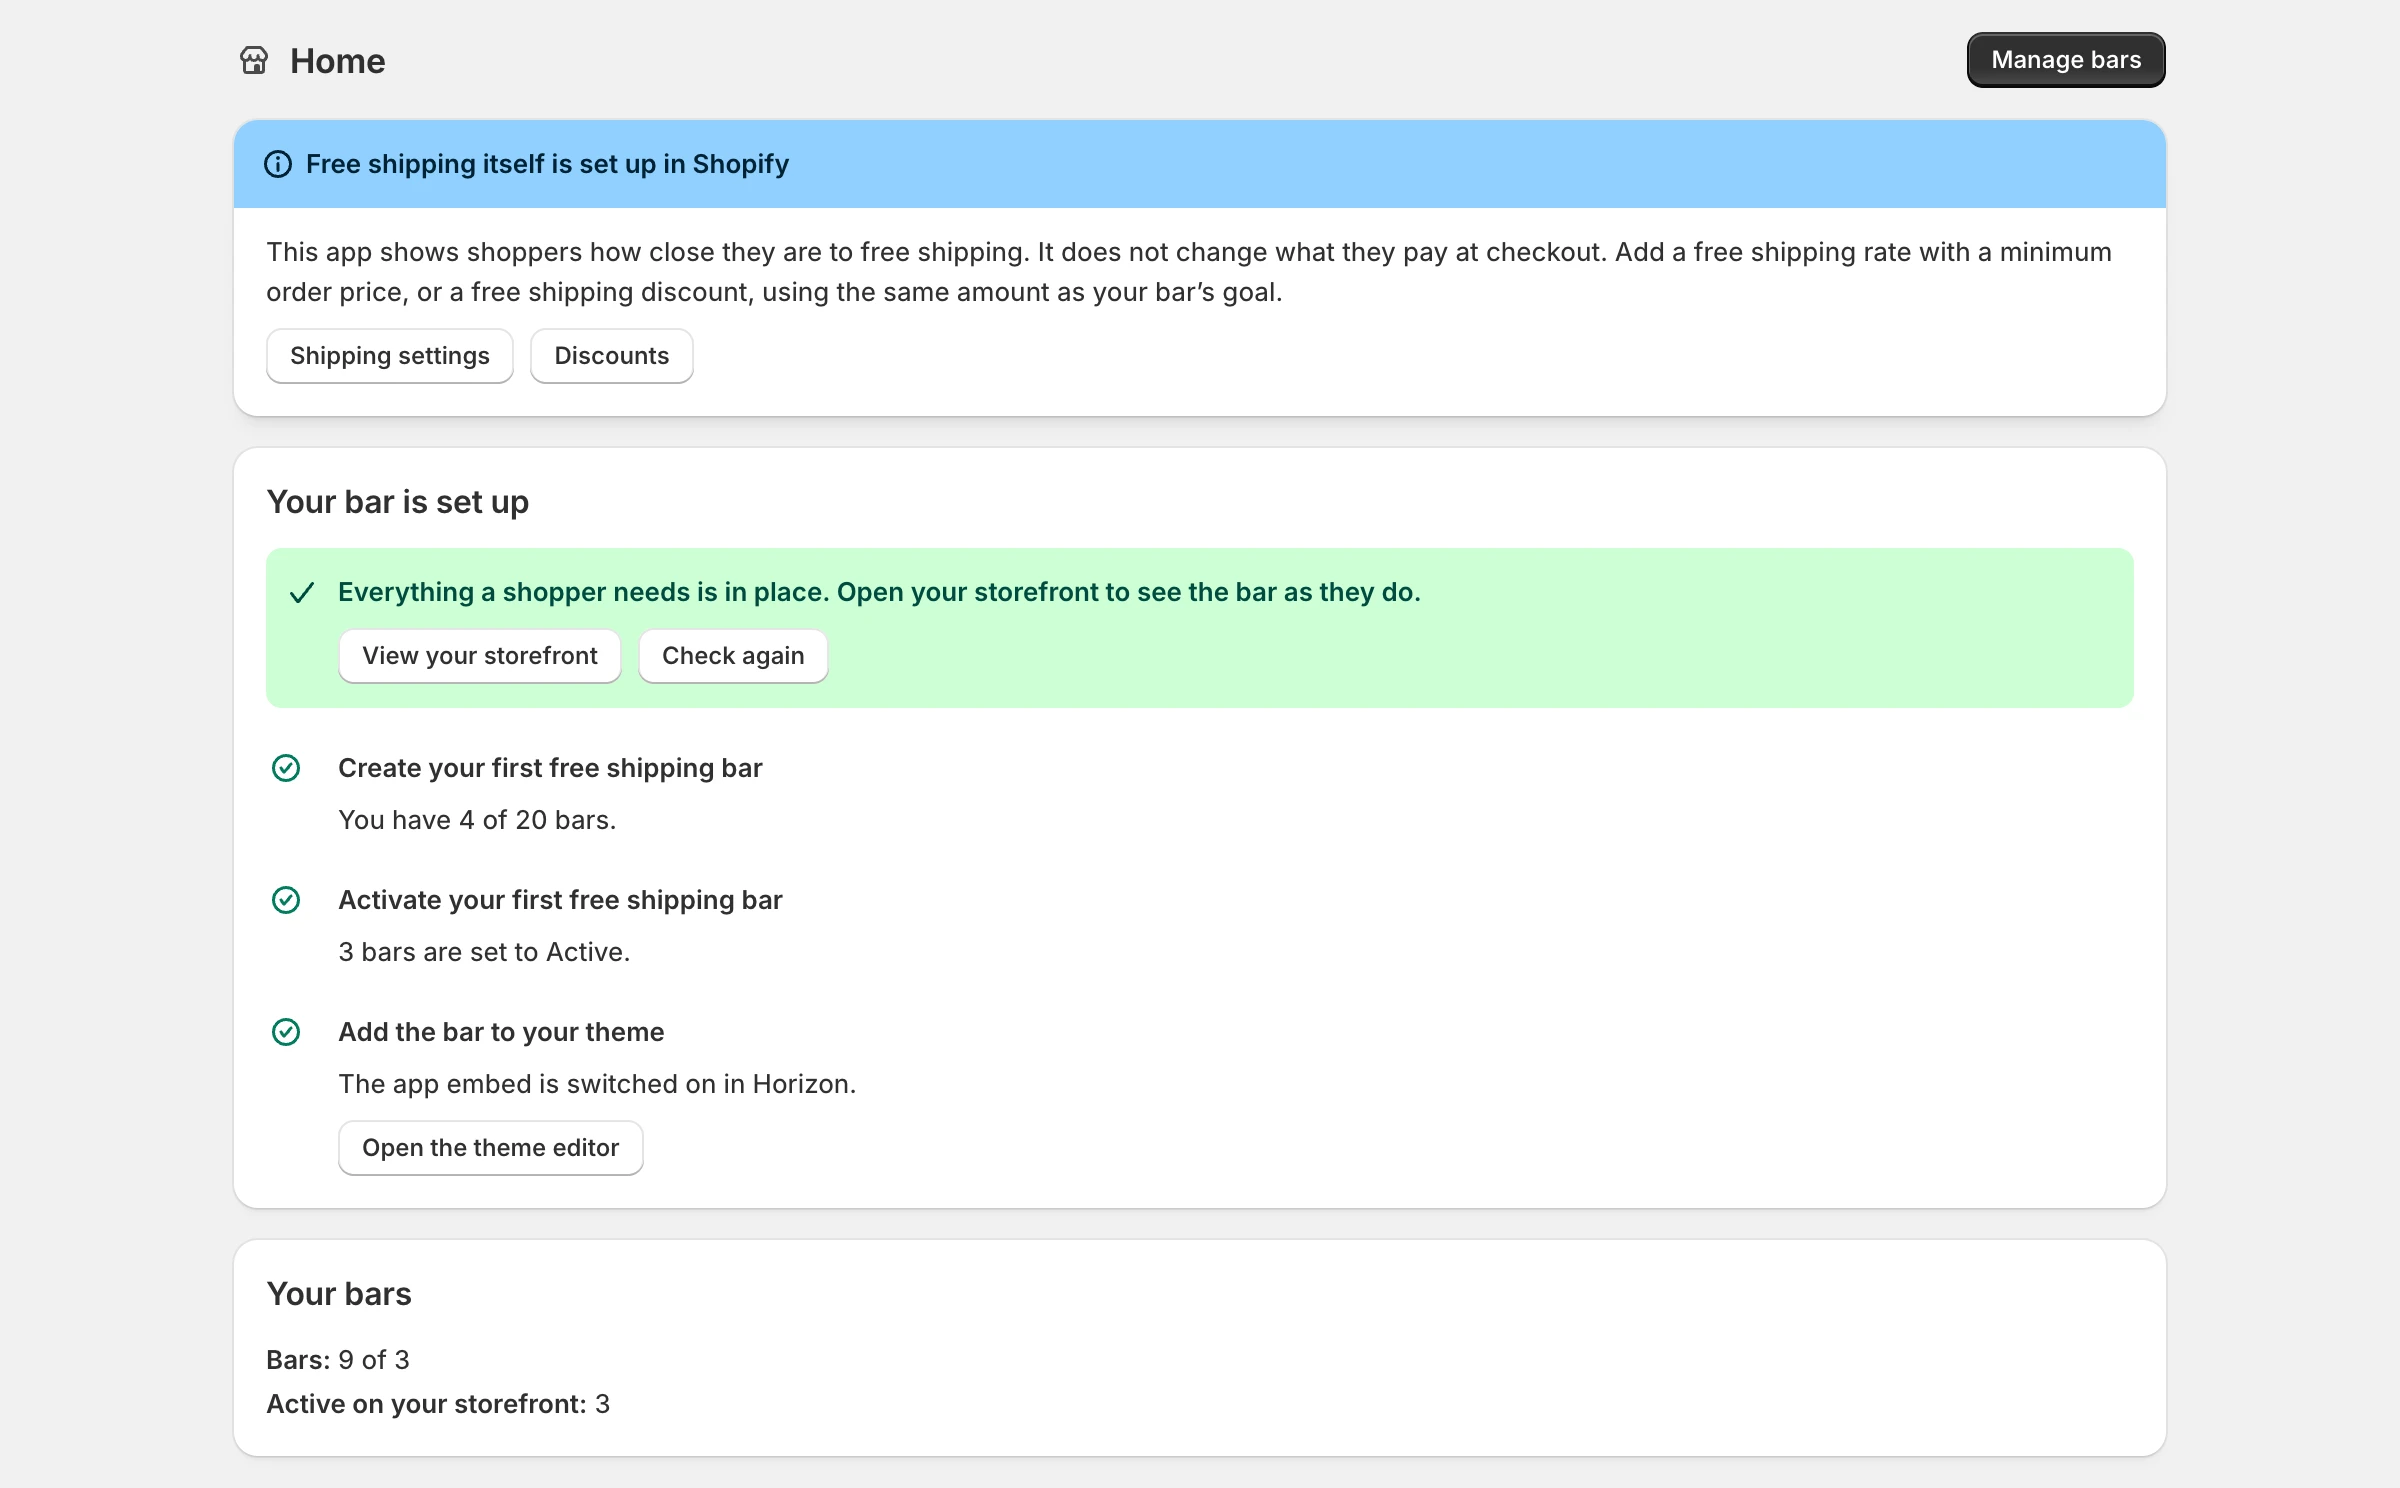
You land on the app's Home page. Its checklist shows what is done and what is left, and each step has a button that takes you there.
2 Turn on the app embed
The bar reaches your storefront through a Shopify app embed. It is off until you switch it on, once per theme.
- On the app's Home page, select Turn on the app embed. The theme editor opens with the embed already switched on.
- Select Save in the top right of the theme editor.
- Back in the app, select Check again. The step turns green.
You can also do it by hand: Online Store → Themes → Customize → App embeds, switch on Free shipping bar, then save.
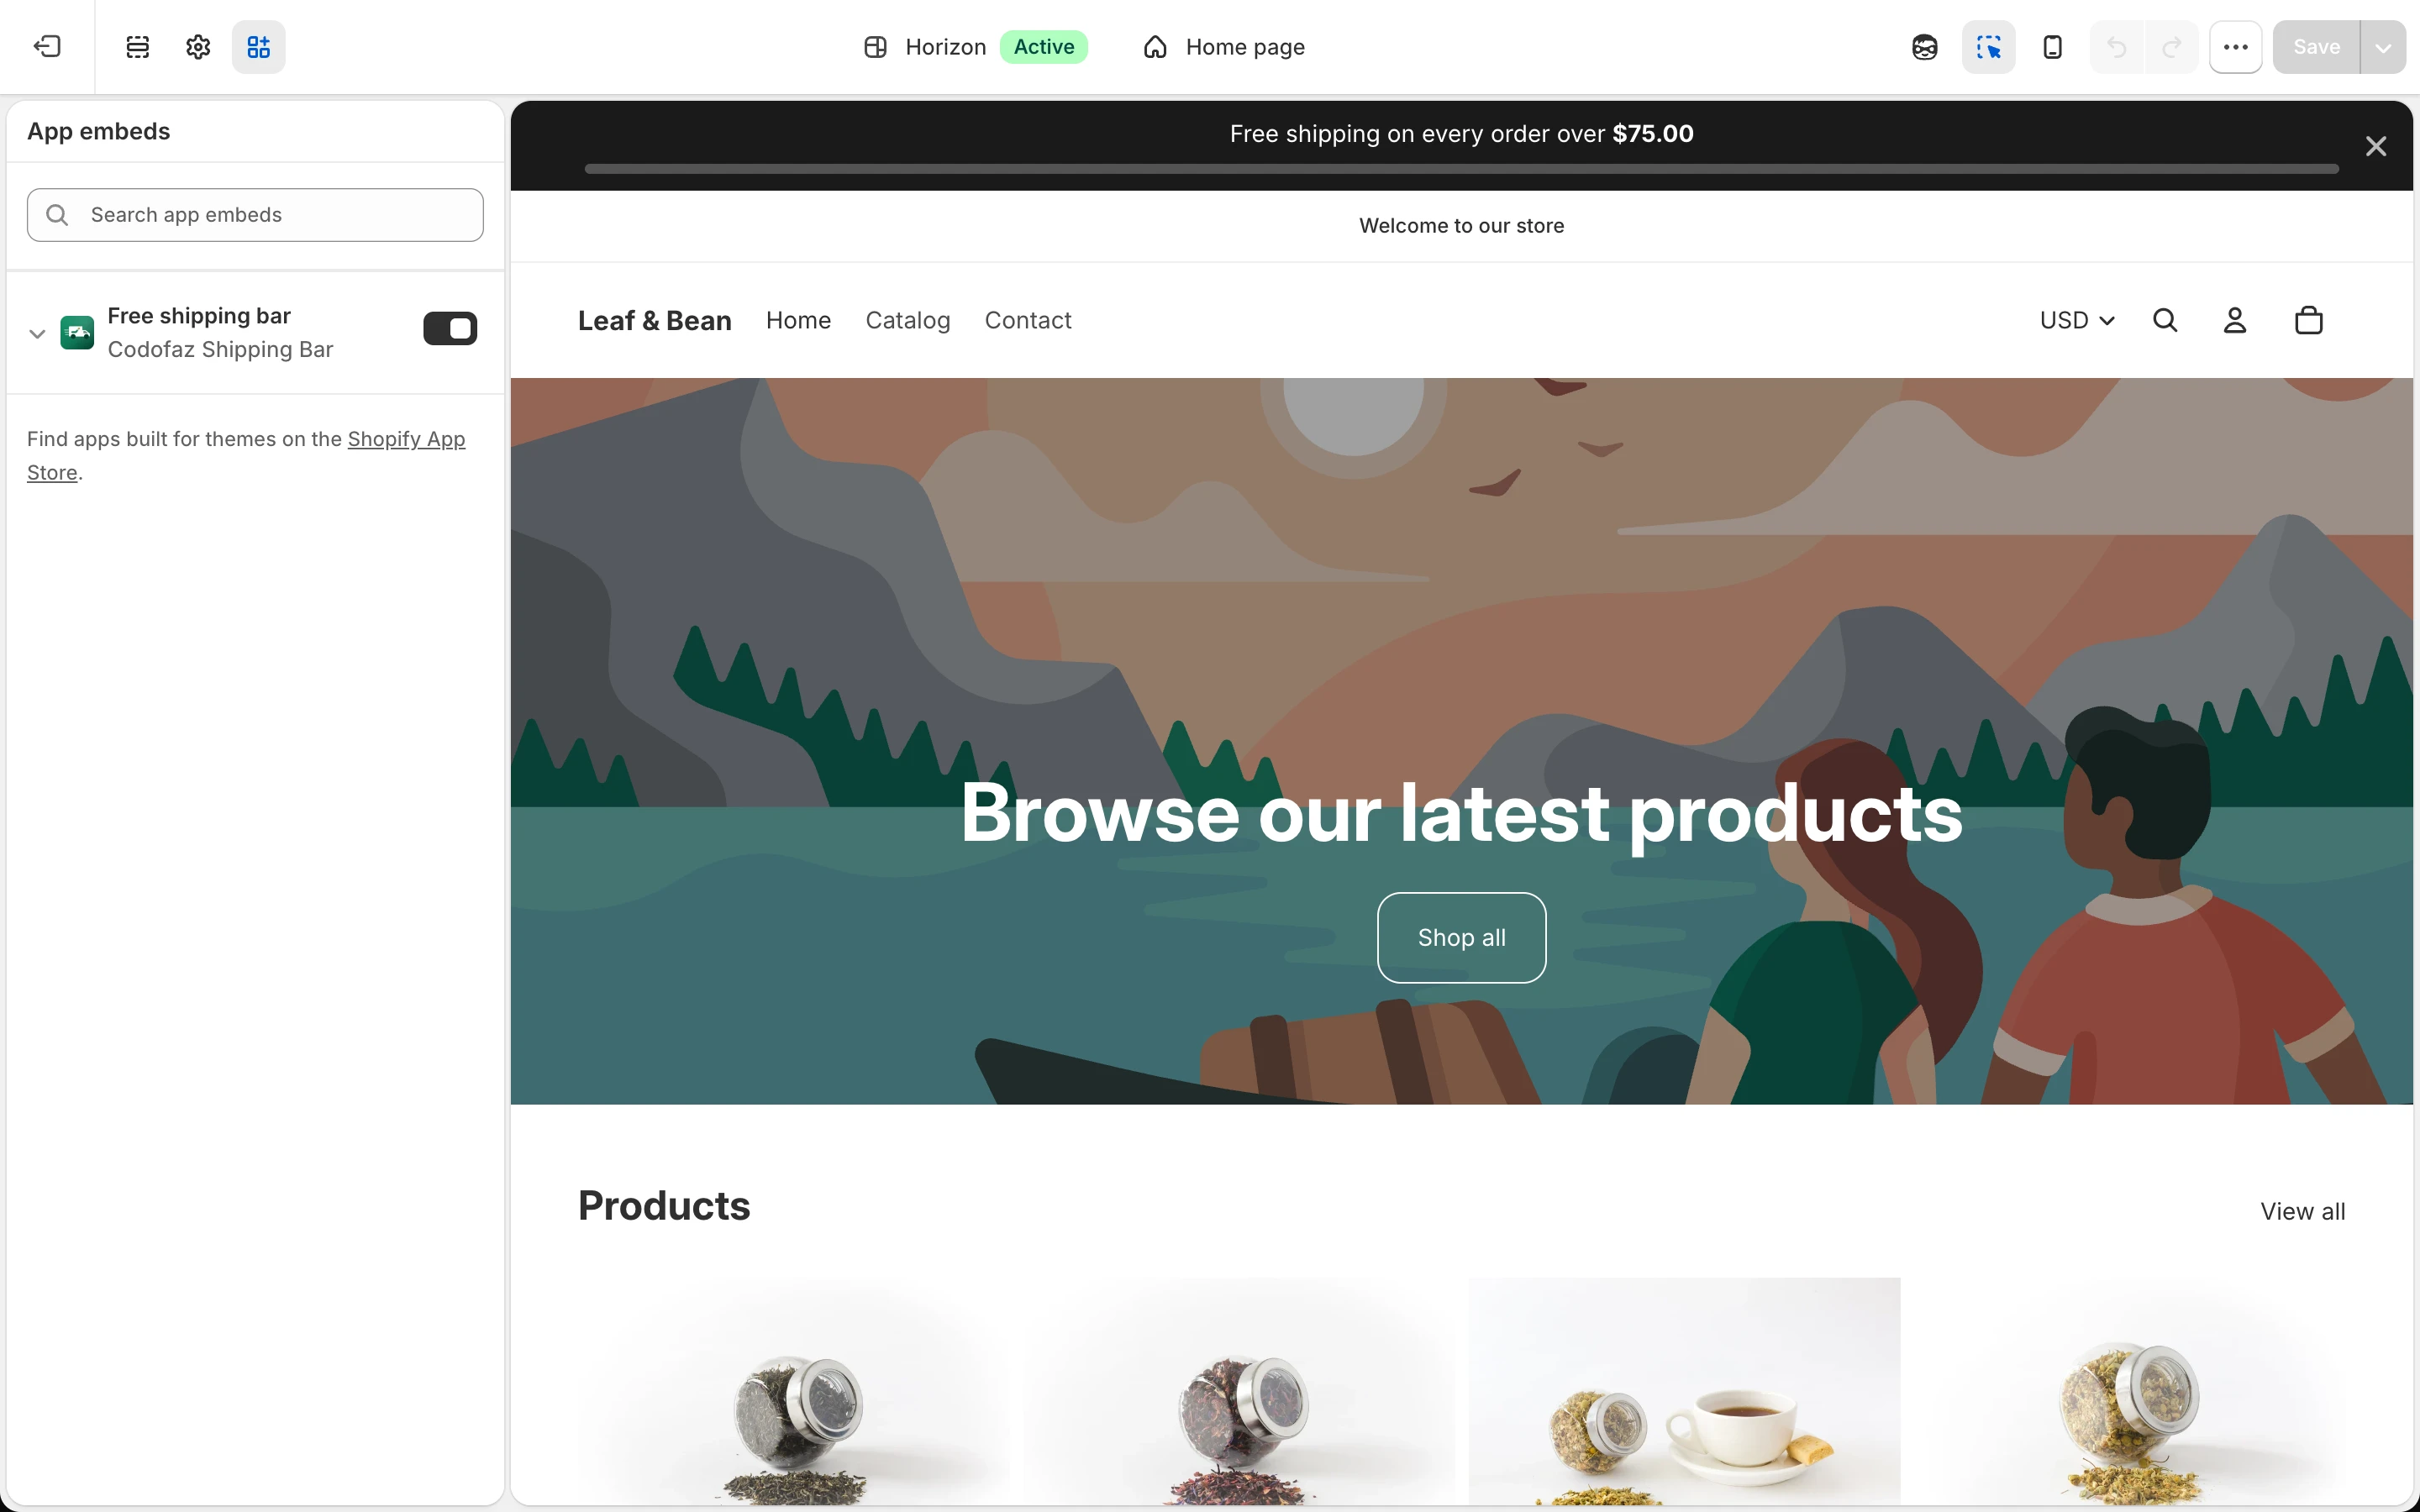
Reinstalled the app? The embed saved in your theme still points at the old installation. Switch it off and on again, and save.
3 Create your first bar
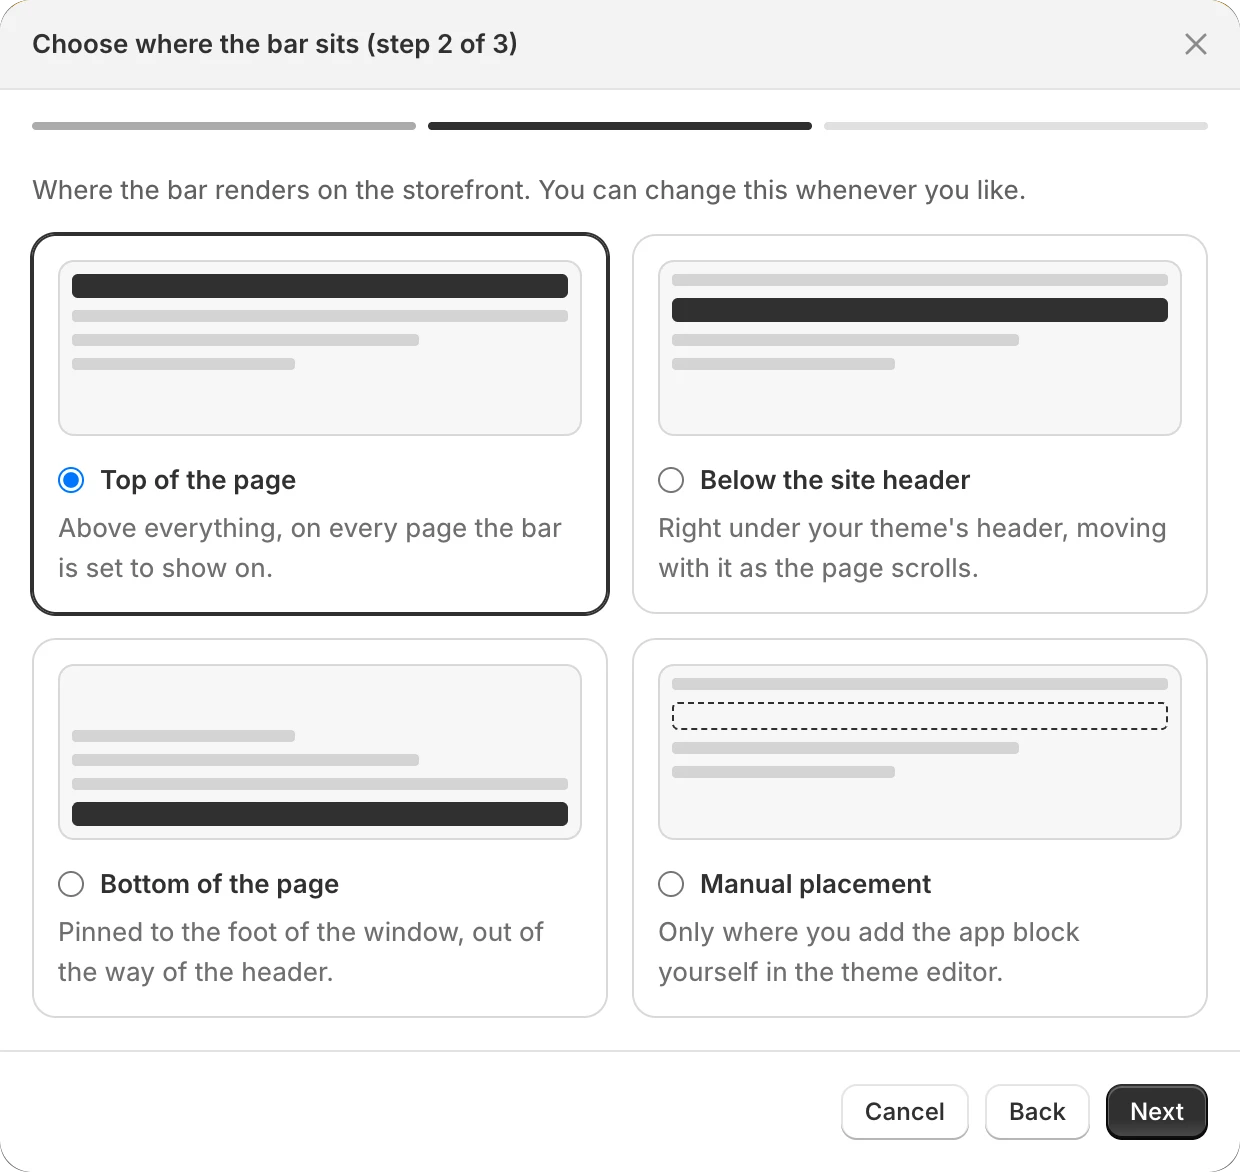
Go to All Bars and select Create bar. Three short steps set up the essentials; everything else can wait for the editor.
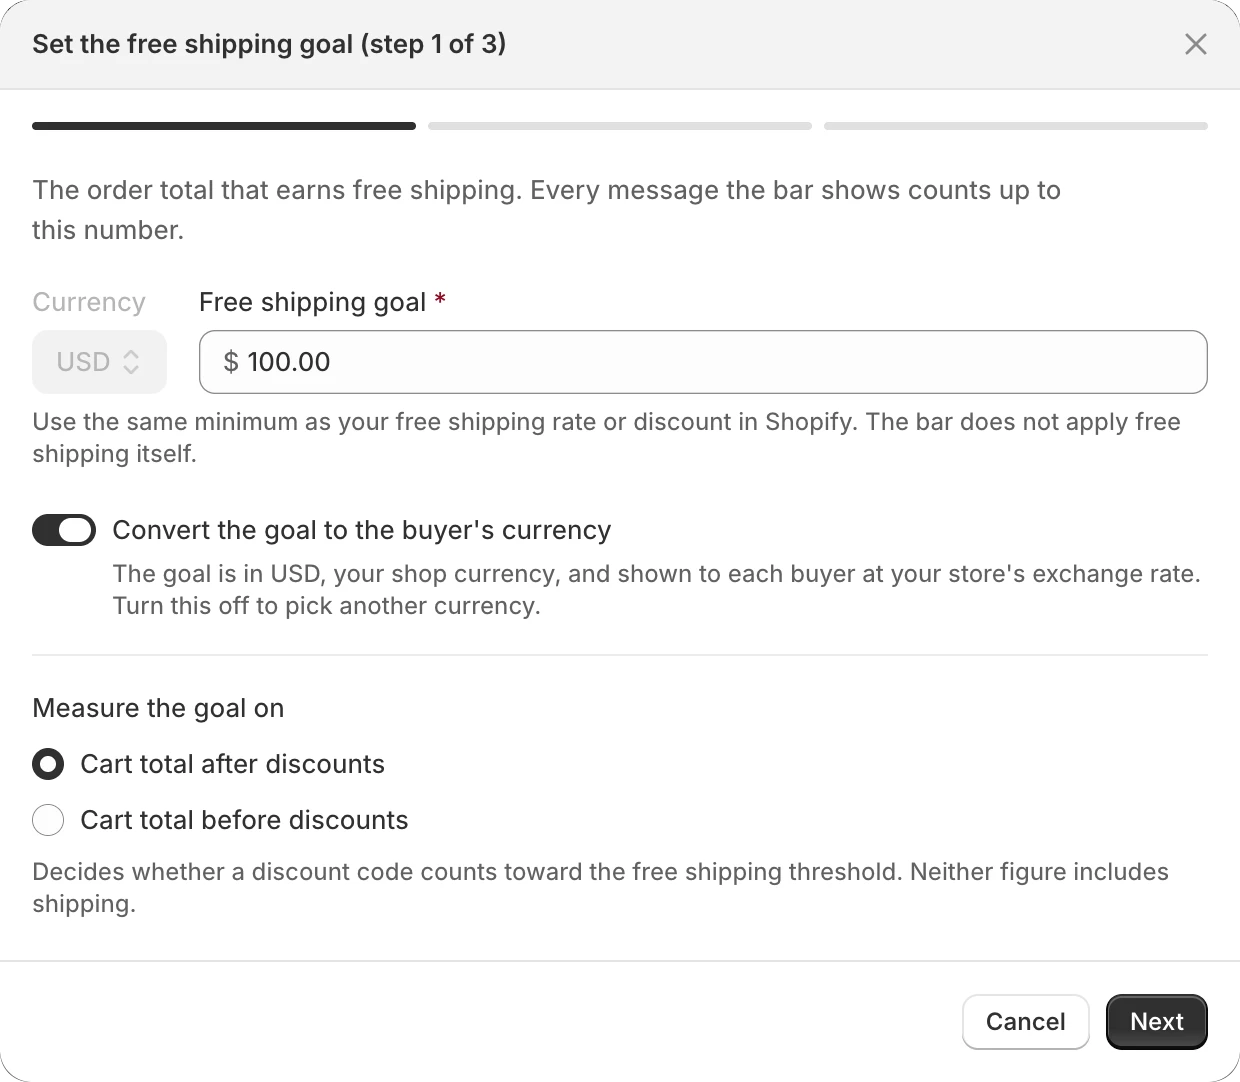
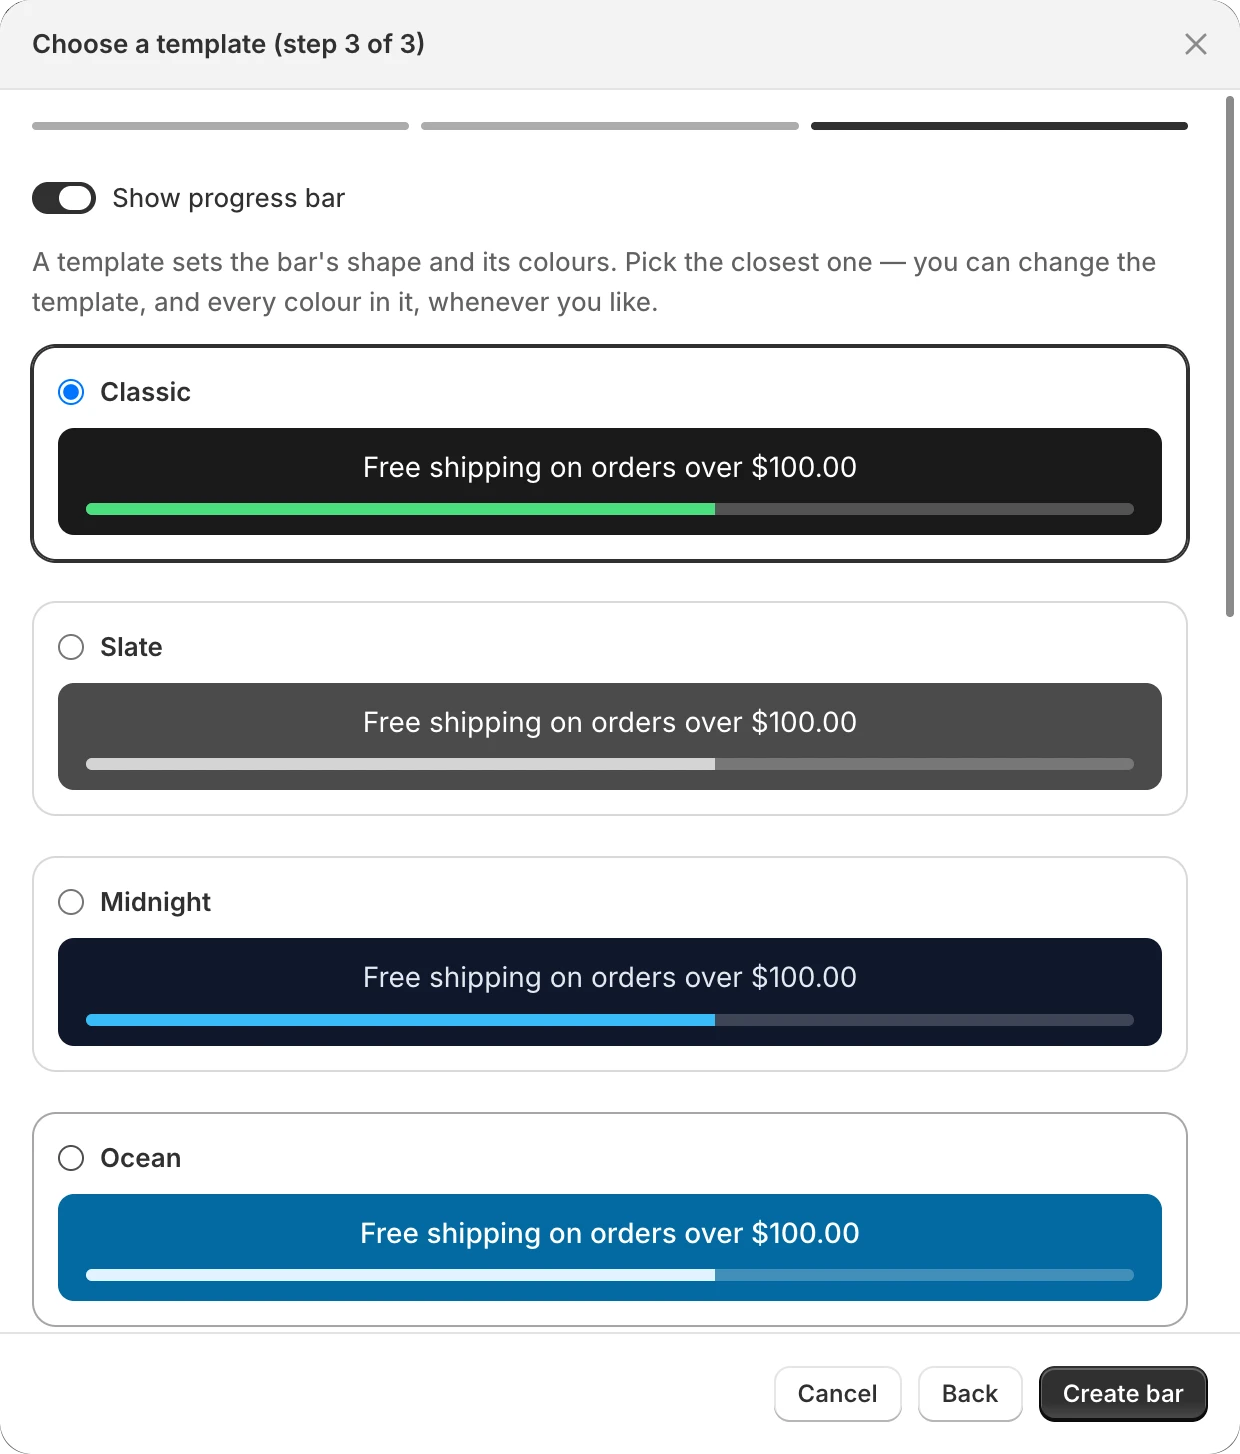
- Goal. Type the order total that earns free shipping — the same amount as your Shopify rate or discount.
- Position. Top of the page, below the site header, bottom of the page, or manual placement.
- Template. Pick one of ten designs. Every colour can be changed later.
Select Create bar. The new bar is saved as a Draft — shoppers do not see it yet — and the editor opens.
Part 2
The bar editor
How the editor works
Settings are on the left, in three tabs: Content, Design and Visibility. Each tab holds a few numbered cards; select a card's title to open or close it.
The Preview on the right shows the bar in its three states — empty cart, part way to the goal, goal reached — and updates as you type. Its More menu copies the bar's ID, switches it on or off, or deletes it.
When you change anything, Shopify's save bar appears at the top of the page. Select Save to keep your changes, or Discard to undo them.
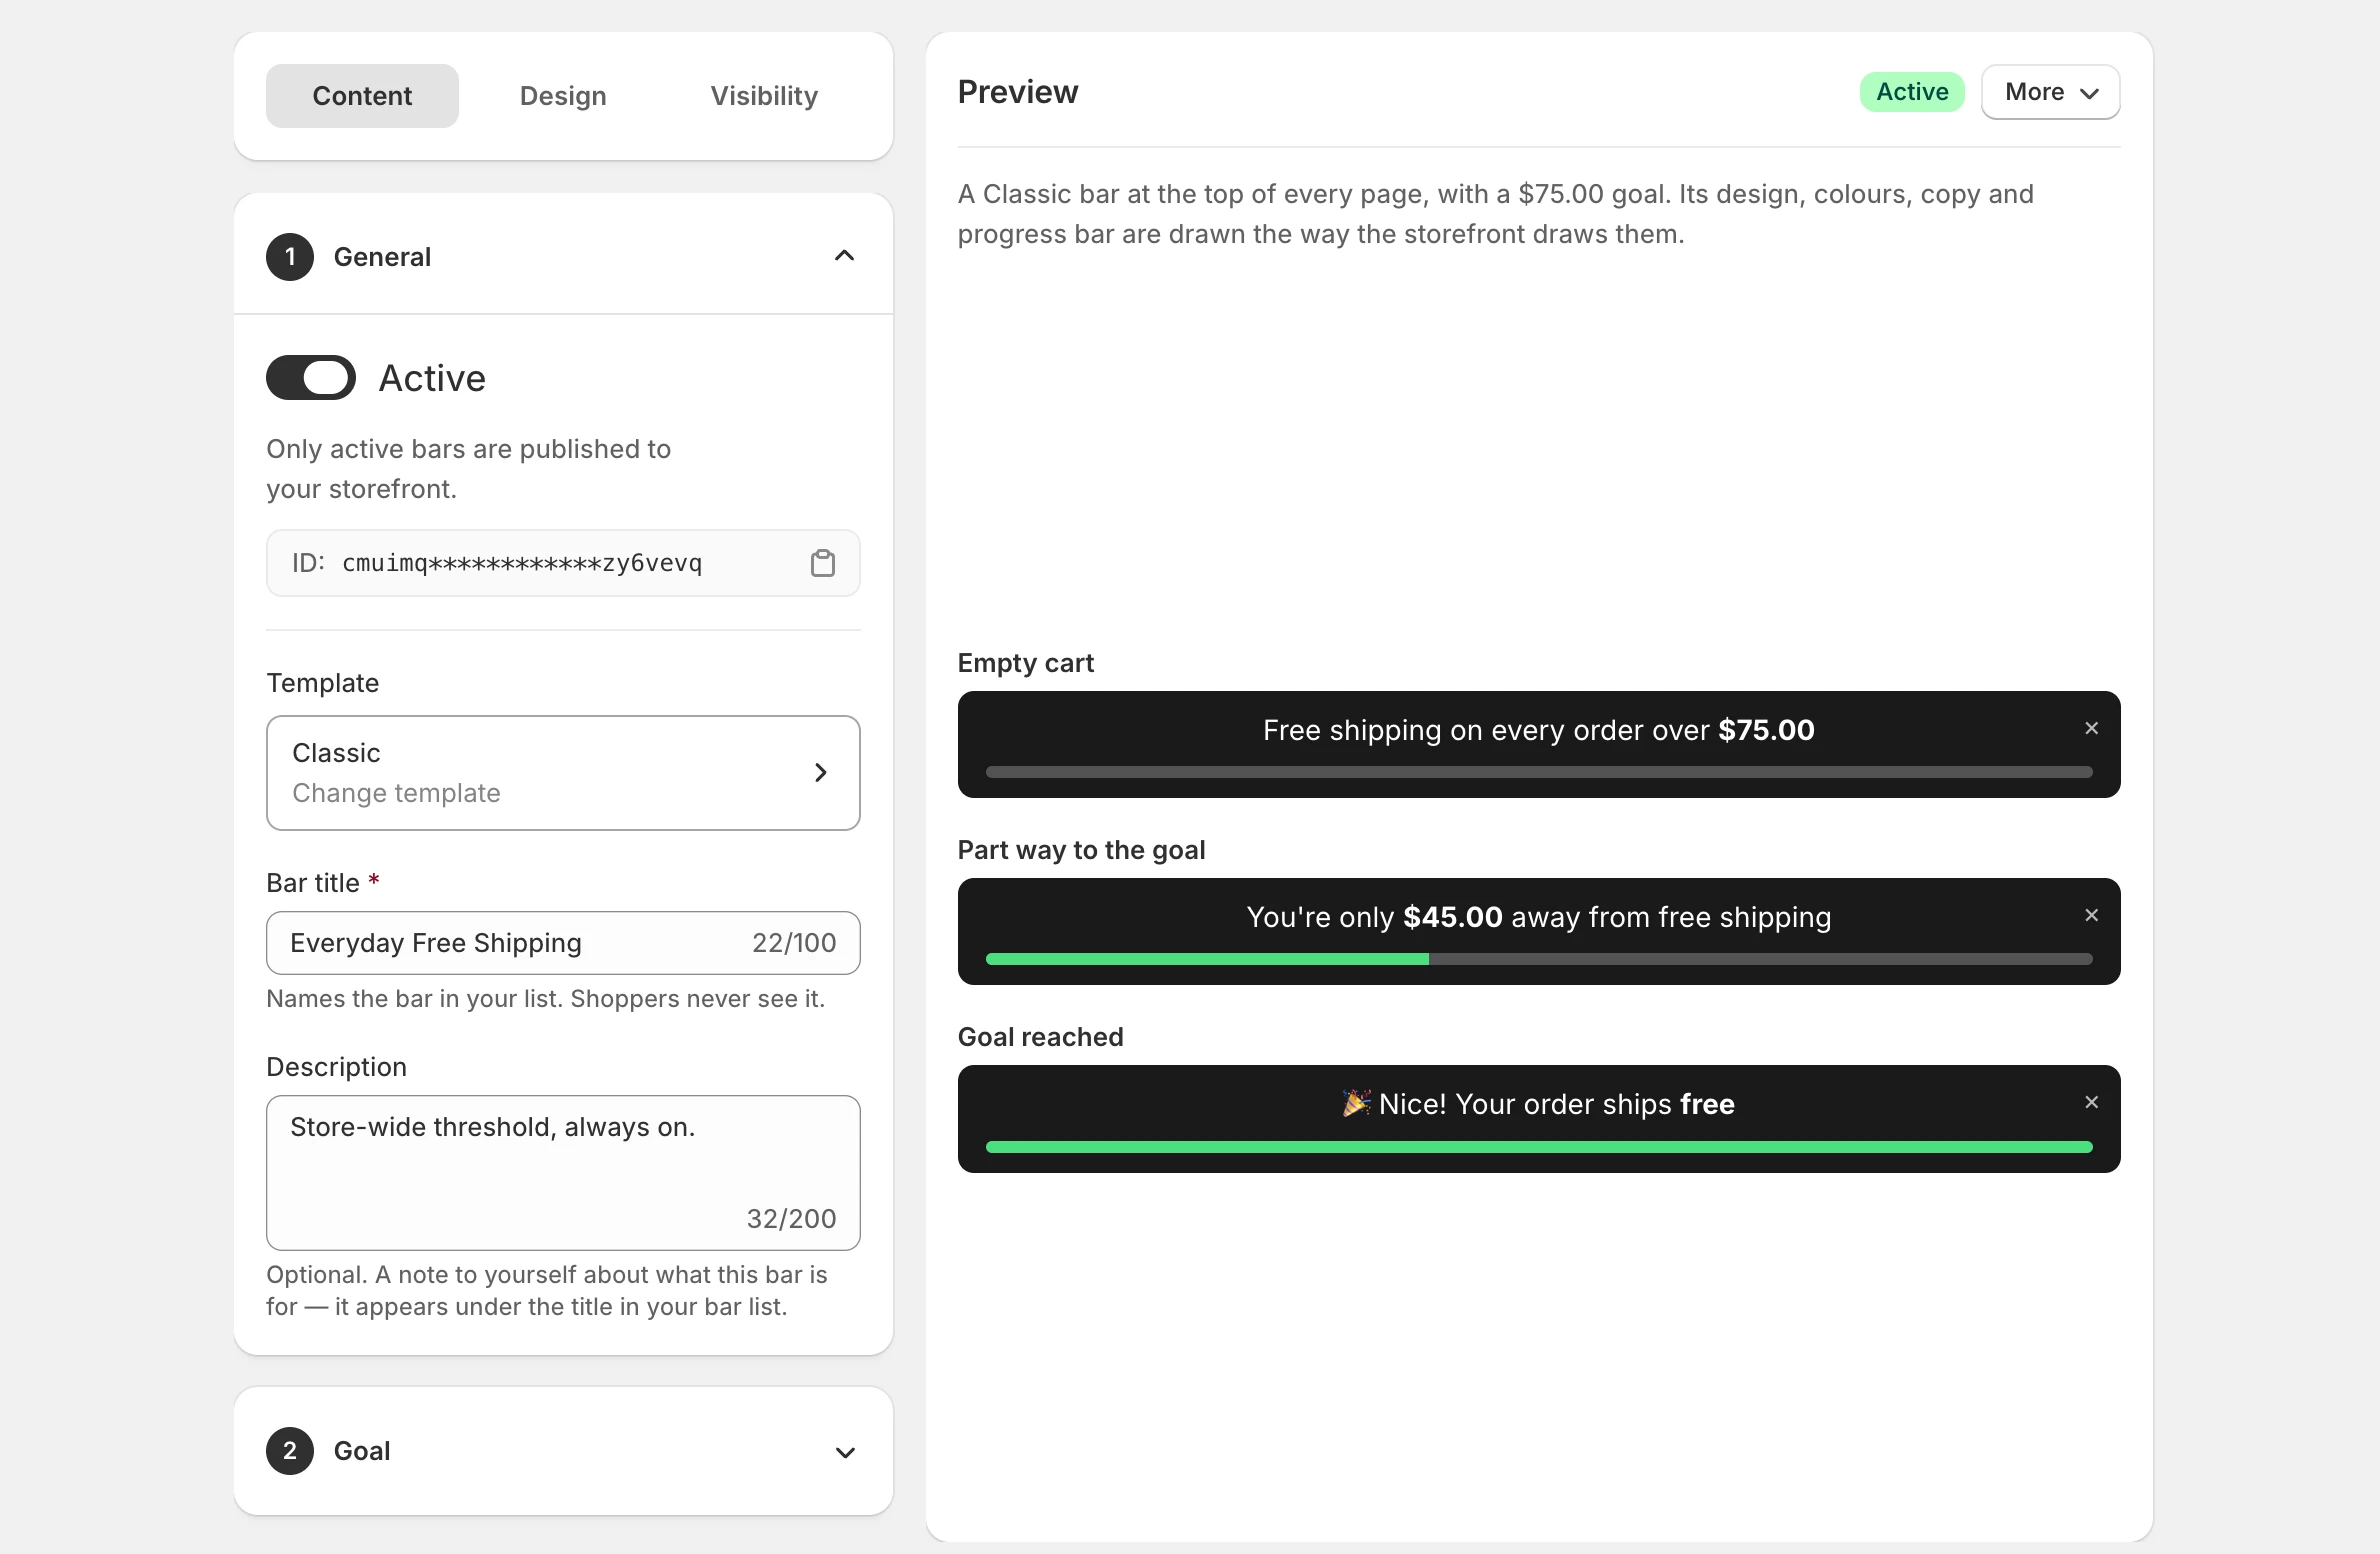
Content tab
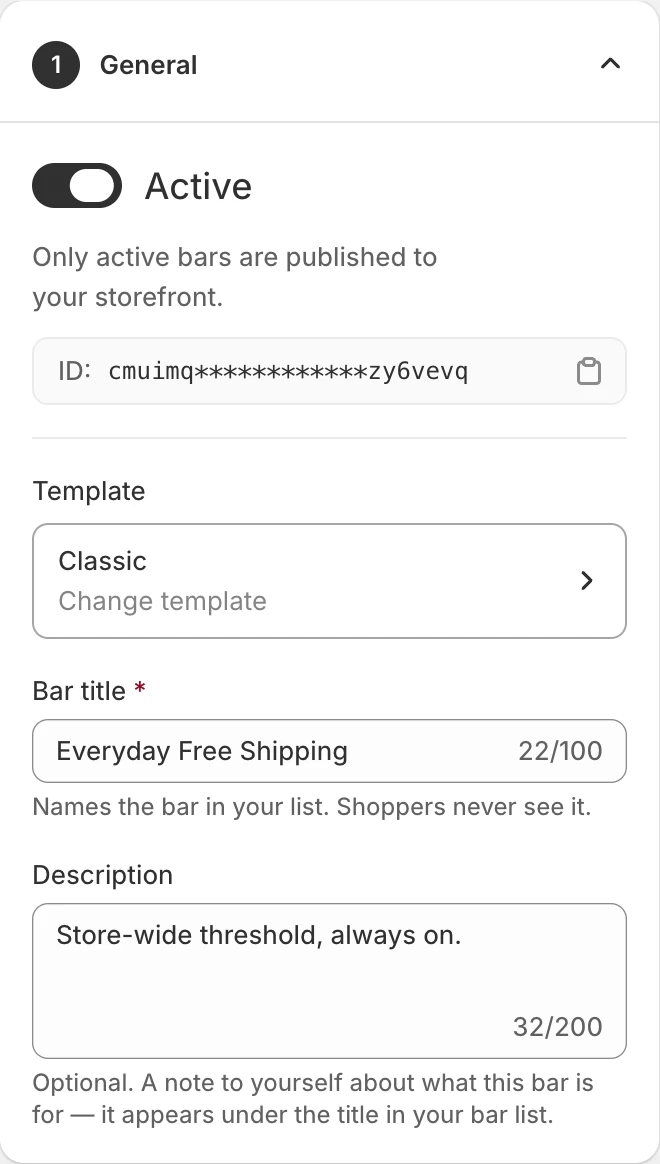
Content · card 1
General
- Active
- Only active bars appear on your storefront. Leave it off while you work; turn it on when the bar is ready.
- ID
- The bar's identifier, with a copy button. You need it only to show one specific bar in a hand-placed block.
- Template
- The design the bar started from. Change template opens the ten designs again; nothing changes until you select Done.
- Bar title
- Names the bar in your list. Shoppers never see it.
- Description
- An optional note to yourself, shown under the title in your list.
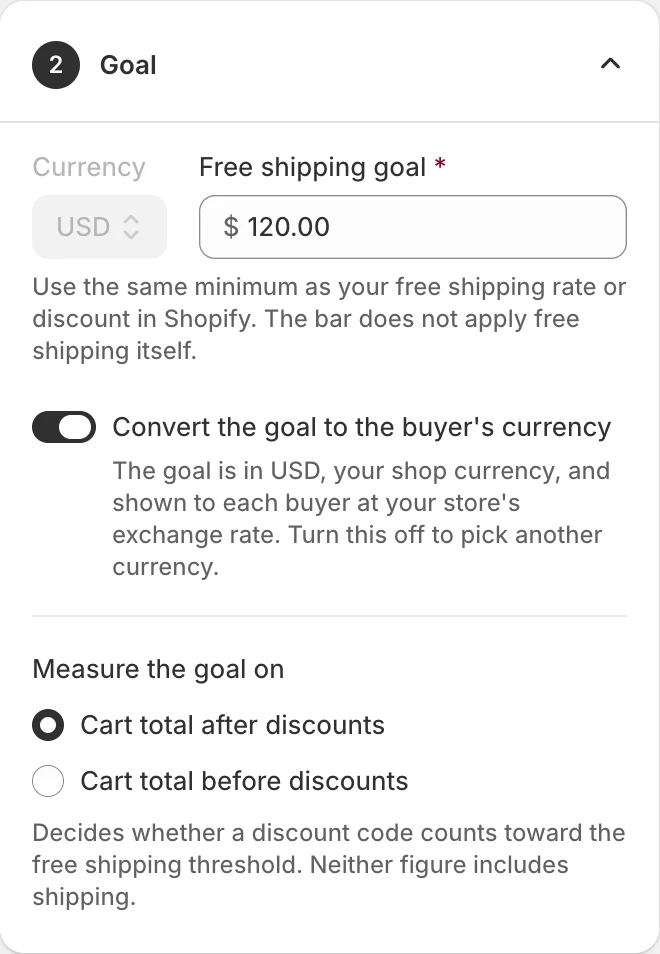
Content · card 2
Goal
- Free shipping goal
- The order total that earns free shipping. Use the same amount as your Shopify shipping rate or discount.
- Convert the goal to the buyer's currency
- On (recommended): the goal is in your store's currency and converted at your store's exchange rate for shoppers who browse in another one. Off: pick one Currency, and only shoppers buying in it see the bar.
- Measure the goal on
- Cart total after discounts counts discount codes, so a code can push a shopper further from the goal. Before discounts ignores them. Neither includes shipping.
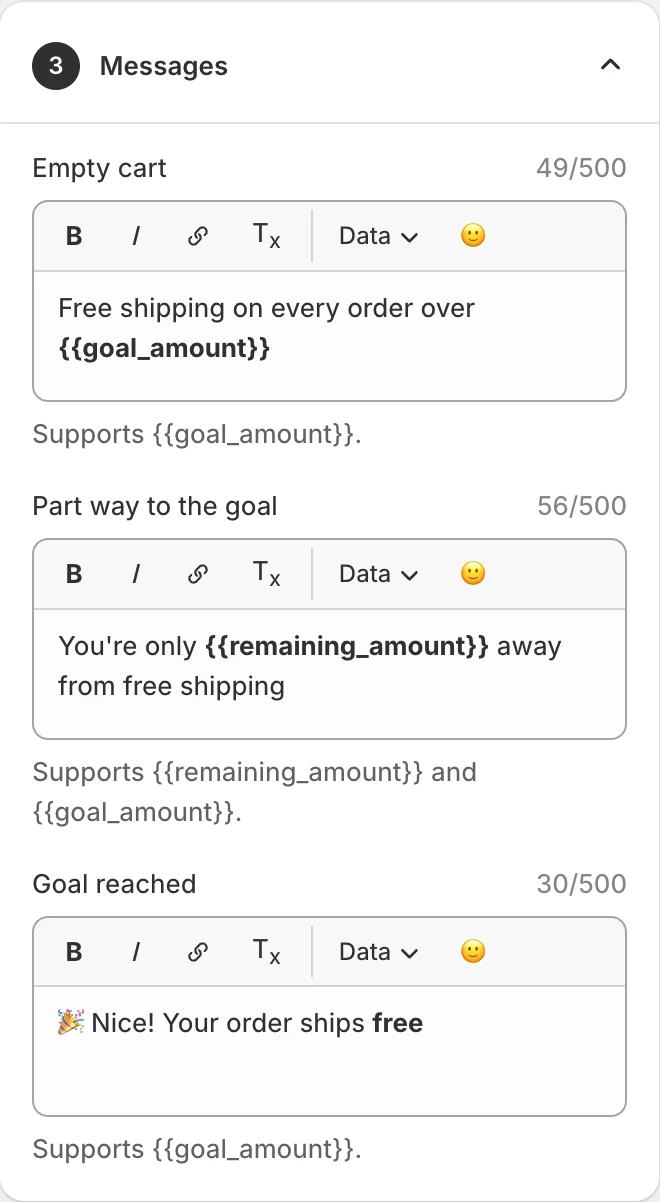
Content · card 3
Messages
A bar says one of three things, depending on the cart.
- Empty cart
-
Shown before anything is in the cart. For example:
Free shipping on orders over
.{{goal_amount}} - Part way to the goal
-
Shown as the cart fills. For example:
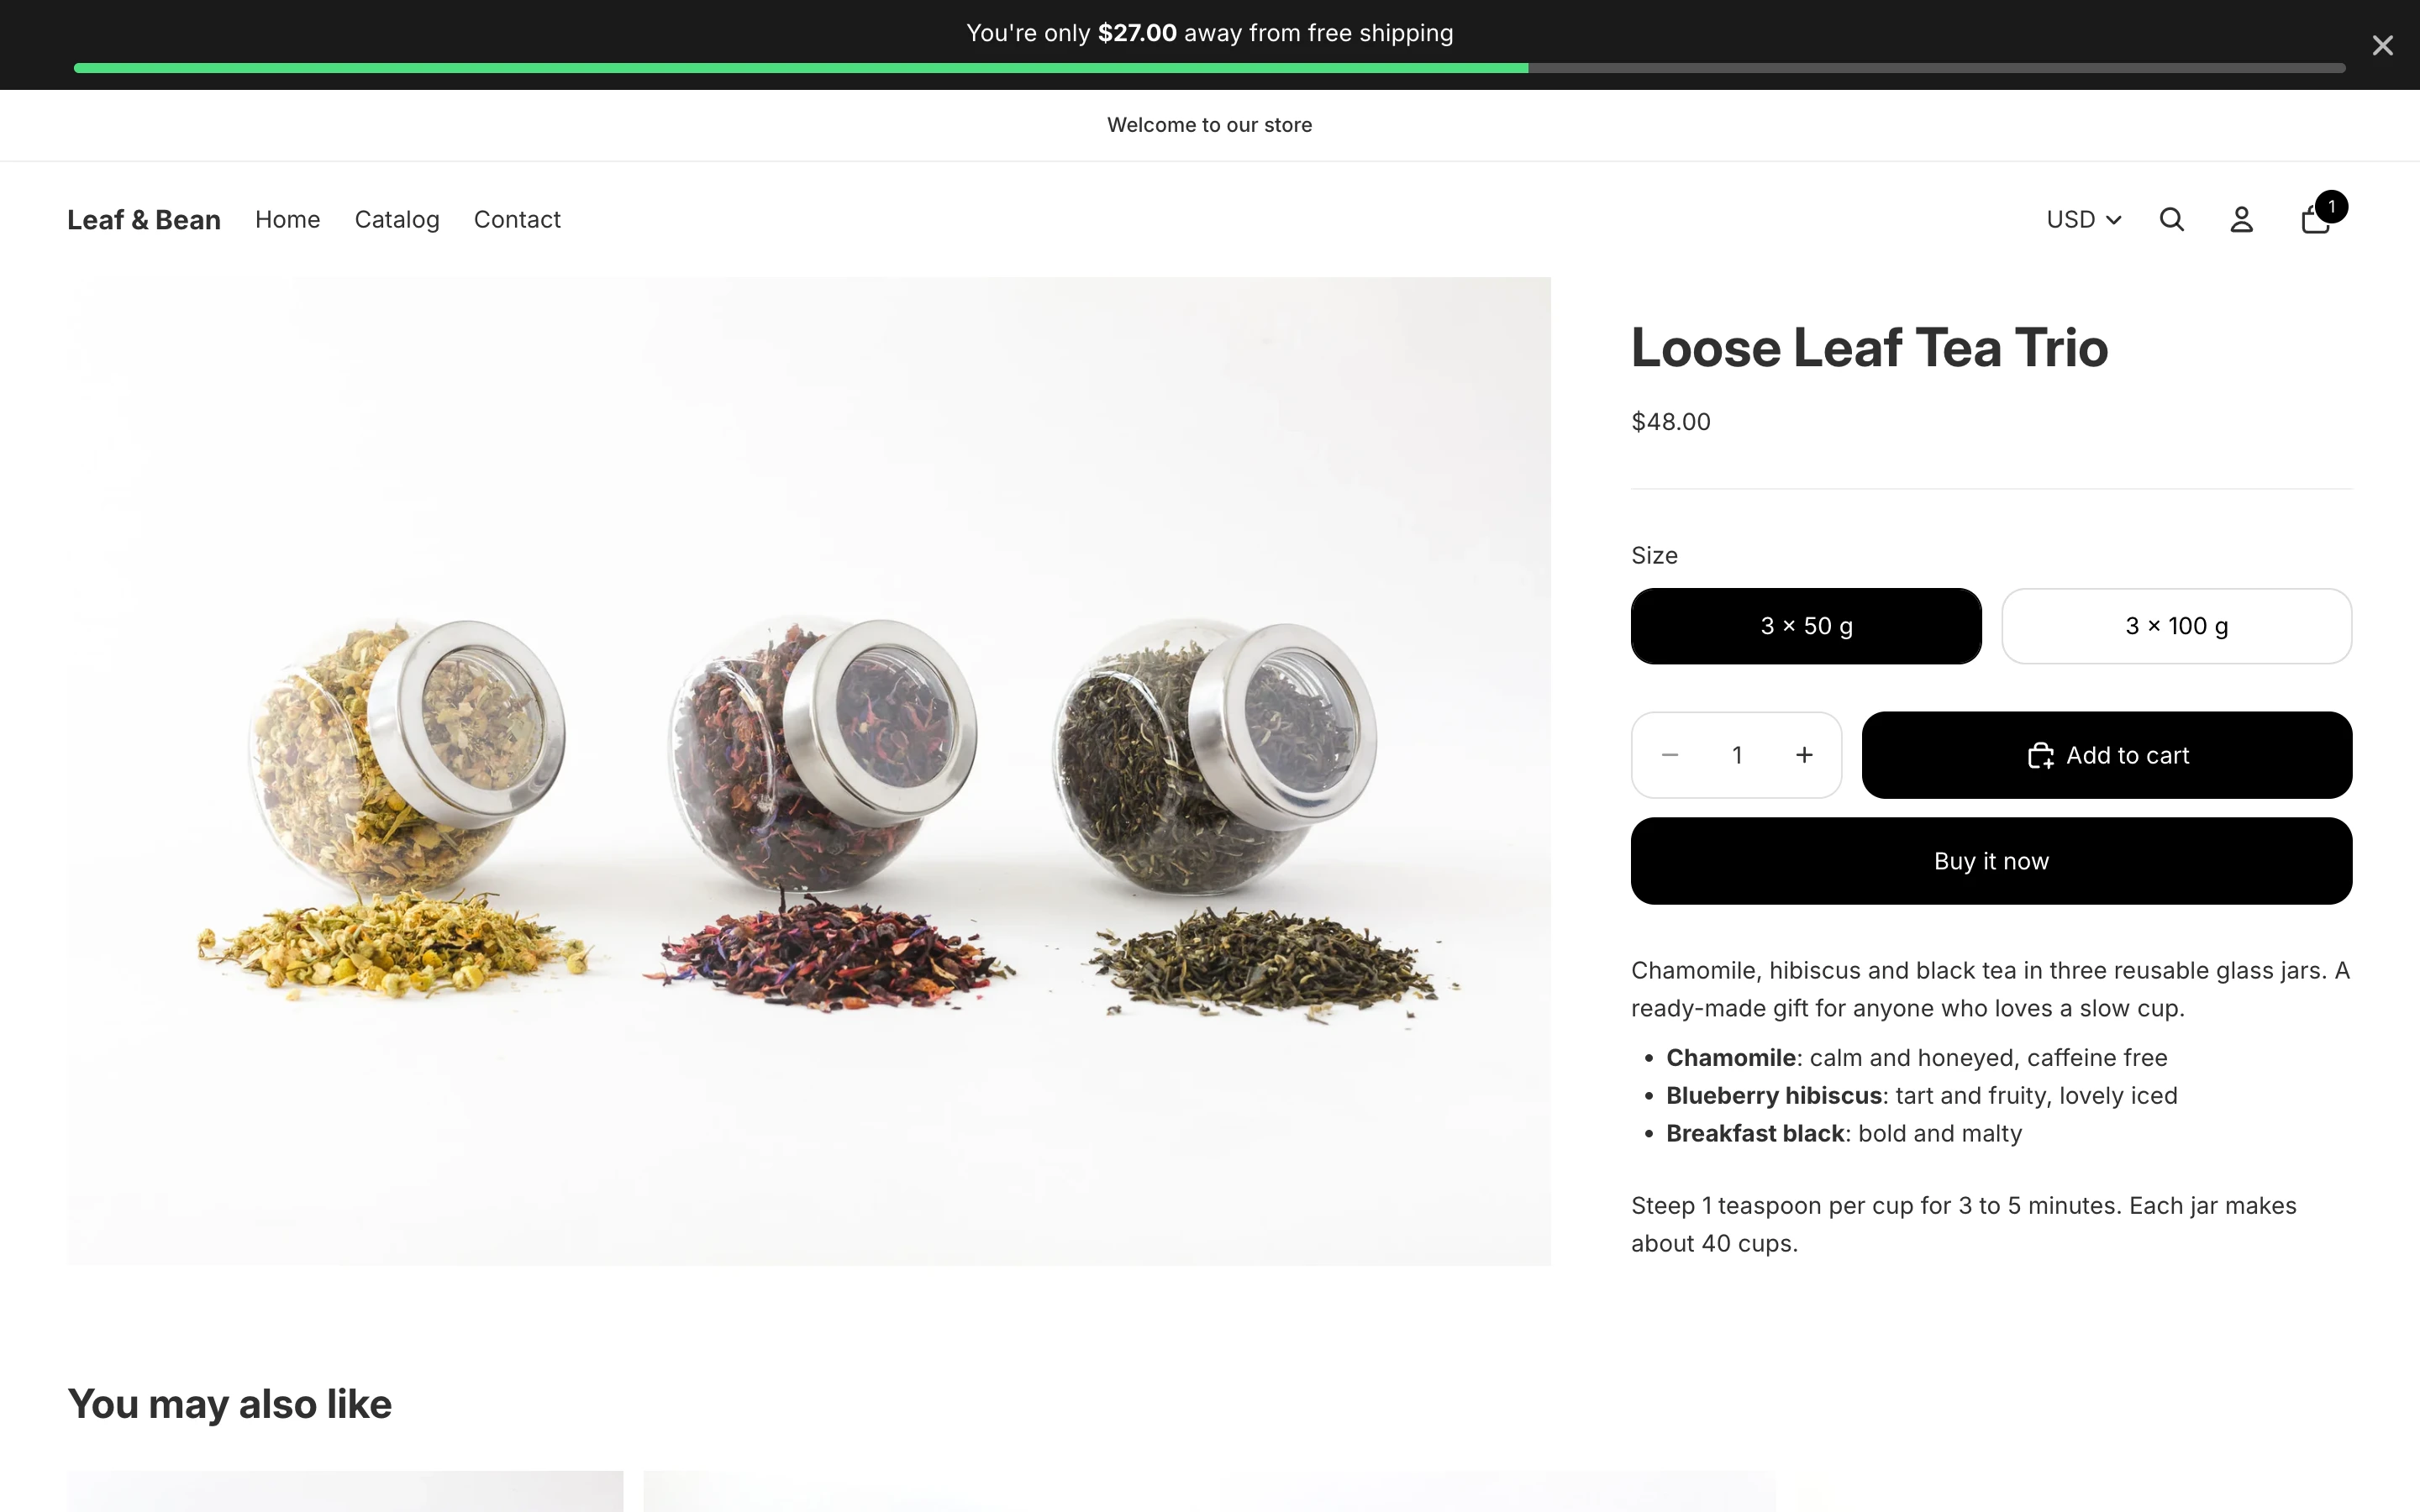
You're only
.{{remaining_amount}}away from free shipping - Goal reached
-
Shown once the cart qualifies. For example:
Your order ships free!
Amounts fill themselves in. Use Data in the toolbar
to insert {{goal_amount}} (the goal) or {{remaining_amount}} (what is left), formatted the way your store shows money.
The toolbar also has Bold, italic, links, clear formatting and emoji. Each message holds up to 500 characters.
Design tab
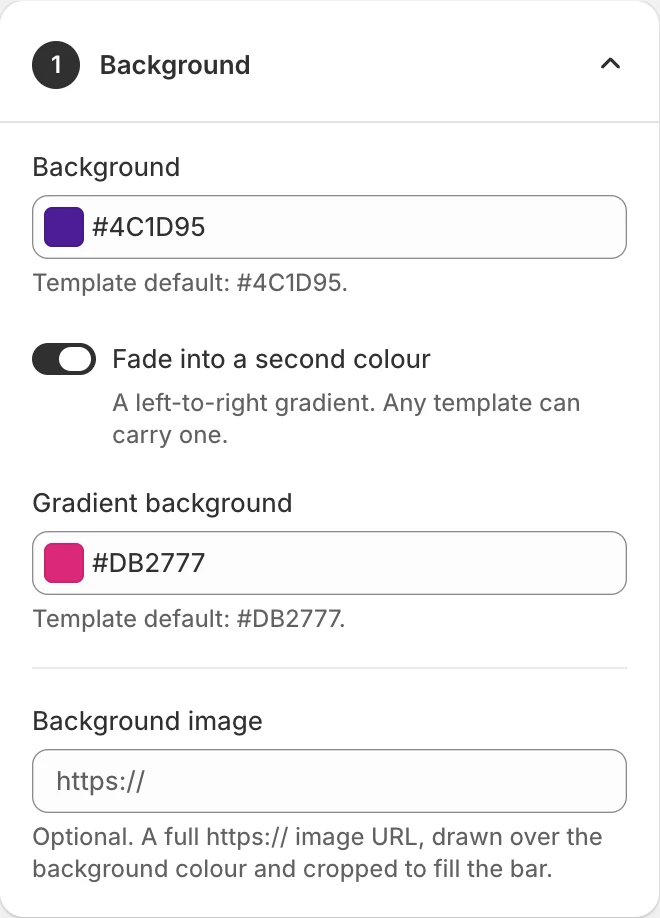
Design · card 1
Background
- Background
- The bar's colour. The template's own colour is shown underneath, so you can always go back to it.
- Fade into a second colour
- Turns the background into a left-to-right gradient, ending in the Gradient background colour. Any template can have one.
- Background image
-
Optional. A full
https://image address, drawn over the colour and cropped to fill the bar.
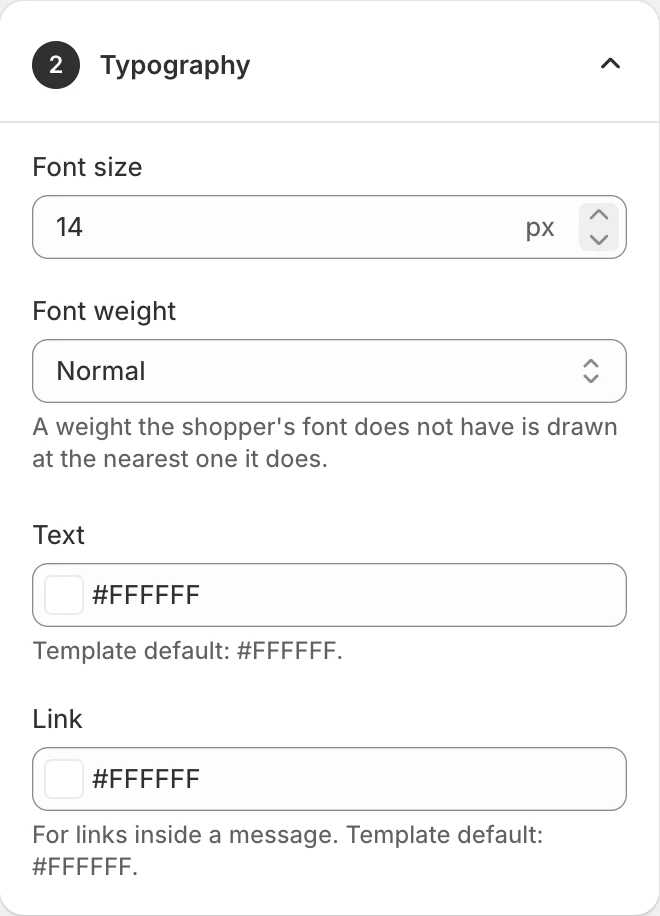
Design · card 2
Typography
- Font size
- From 8 to 48 pixels. 14 is the default.
- Font weight
- Light to Extra bold. The bar uses your theme's own font, so if it lacks a weight, the nearest one is used.
- Text
- The colour of the message.
- Link
- The colour of any link you add inside a message.
If a colour pair is hard to read, the card shows Low contrast against the background. Adjust until the warning goes away.
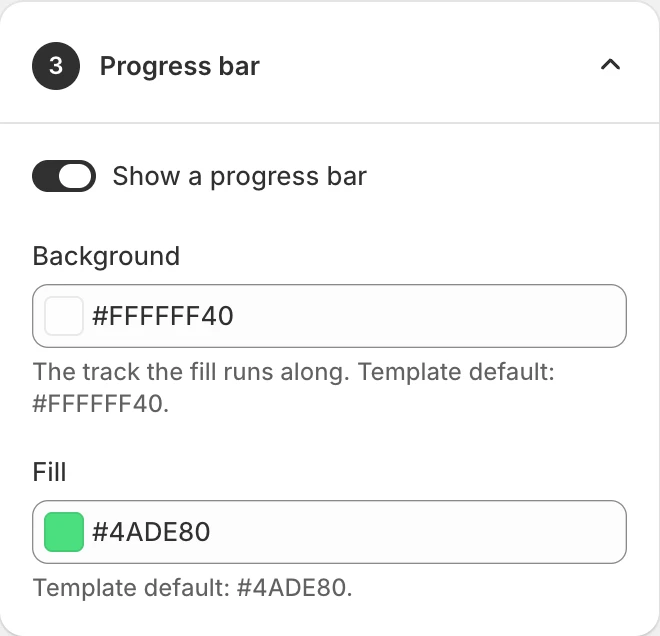
Design · card 3
Progress bar
- Show a progress bar
- The line under the message that fills as the cart grows. Turn it off to show only the message.
- Background
- The empty track the fill runs along.
- Fill
- The part that grows toward the goal.
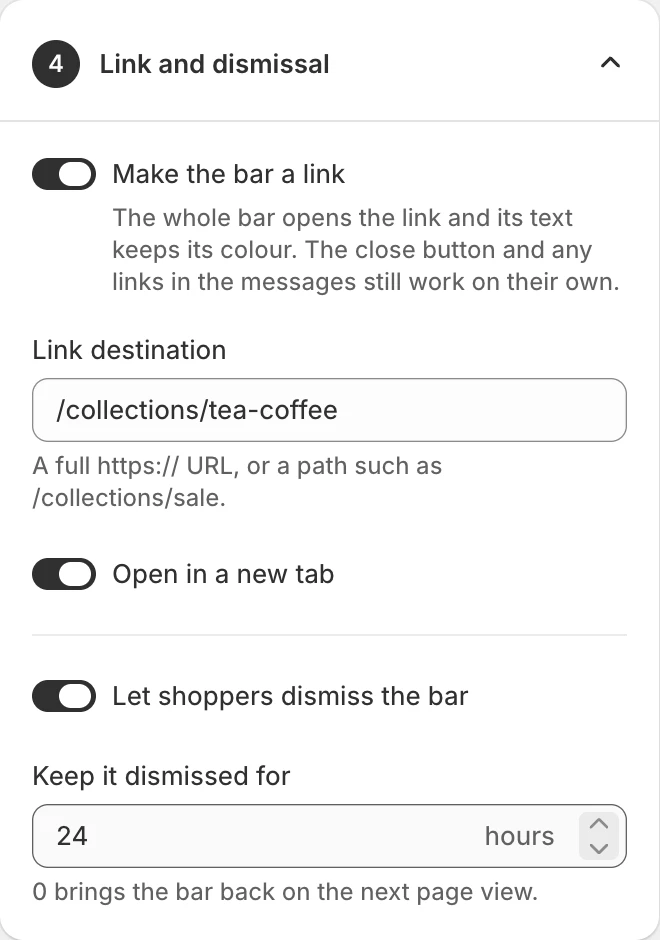
Design · card 4
Link and dismissal
- Make the bar a link
- The whole bar becomes clickable. A good use: send a shopper who is nearly there to a collection of small add-ons.
- Link destination
-
A full
https://address, or a path in your store such as/collections/sale. - Open in a new tab
- On by default.
- Let shoppers dismiss the bar
- Adds a × button so a shopper can close the bar.
- Keep it dismissed for
-
How many hours a closed bar stays closed on that device.
0brings it back on the next page view.
Visibility tab
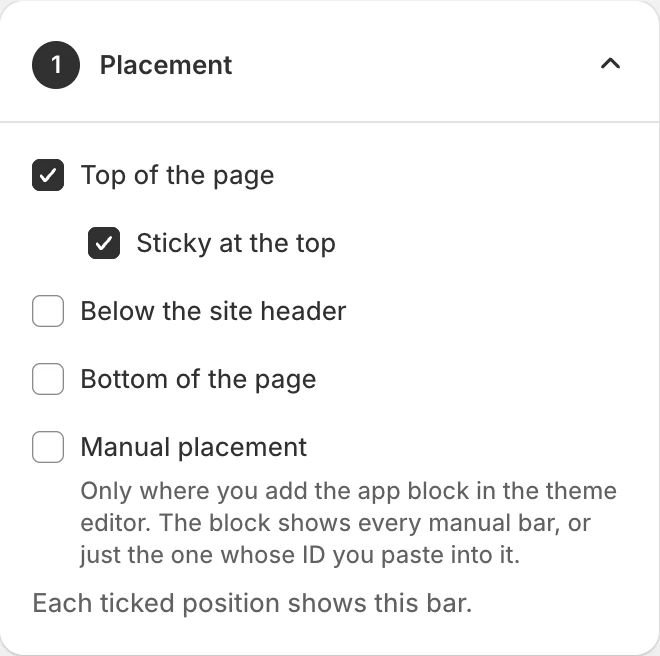
Visibility · card 1
Placement
Tick one or more positions. The bar shows in each one.
- Top of the page
- Above everything else. With Sticky at the top, it stays in view as the shopper scrolls.
- Below the site header
- Right under your menu, moving with the header.
- Bottom of the page
- Along the foot of the window. Sticky at the bottom keeps it pinned there.
- Manual placement
- Only where you add the app block in the theme editor. See Place a bar by hand.
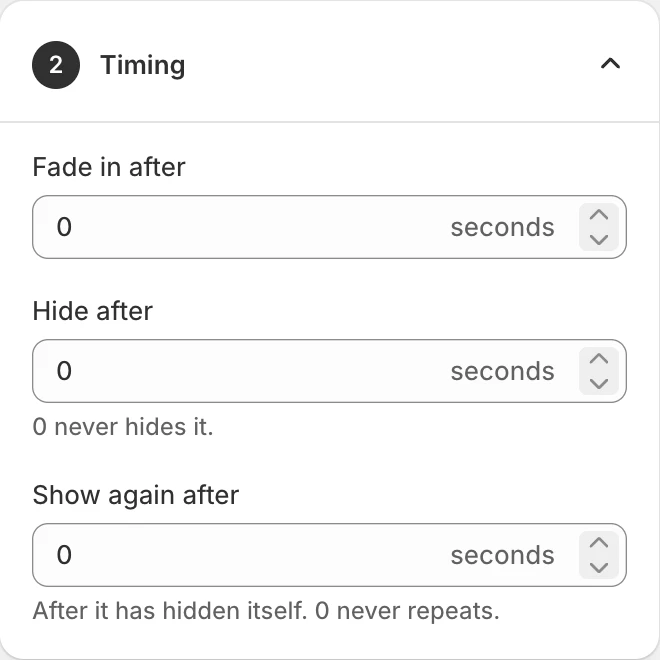
Visibility · card 2
Timing
All three are in seconds. 0 switches each one off.
- Fade in after
- Wait this long after the page opens before the bar appears.
- Hide after
- Hide the bar once it has been on screen this long.
- Show again after
- After hiding itself, bring the bar back after this gap.
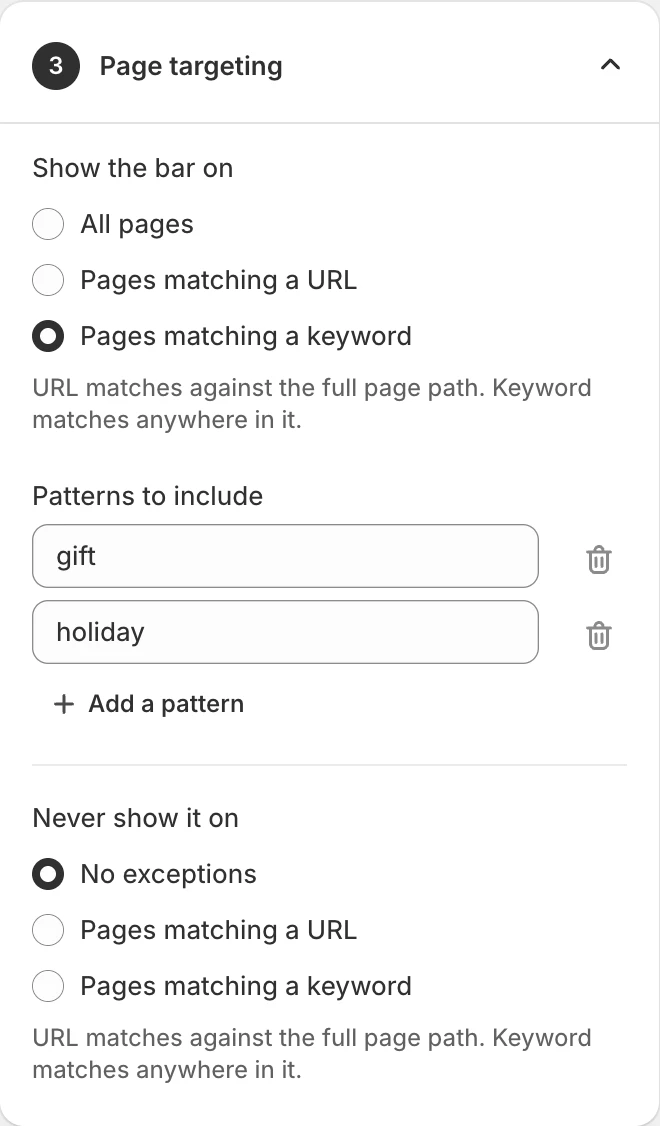
Visibility · card 3
Page targeting
- Show the bar on
- All pages, or only Pages matching a URL, or only Pages matching a keyword. Add as many patterns as you need.
- Never show it on
- Pages to leave out, matched the same way. Handy for keeping the bar off your cart or a landing page.
URL matches the page's full path, like
/collections/gifts. Keyword matches anywhere in
it, so gift catches every gift page.
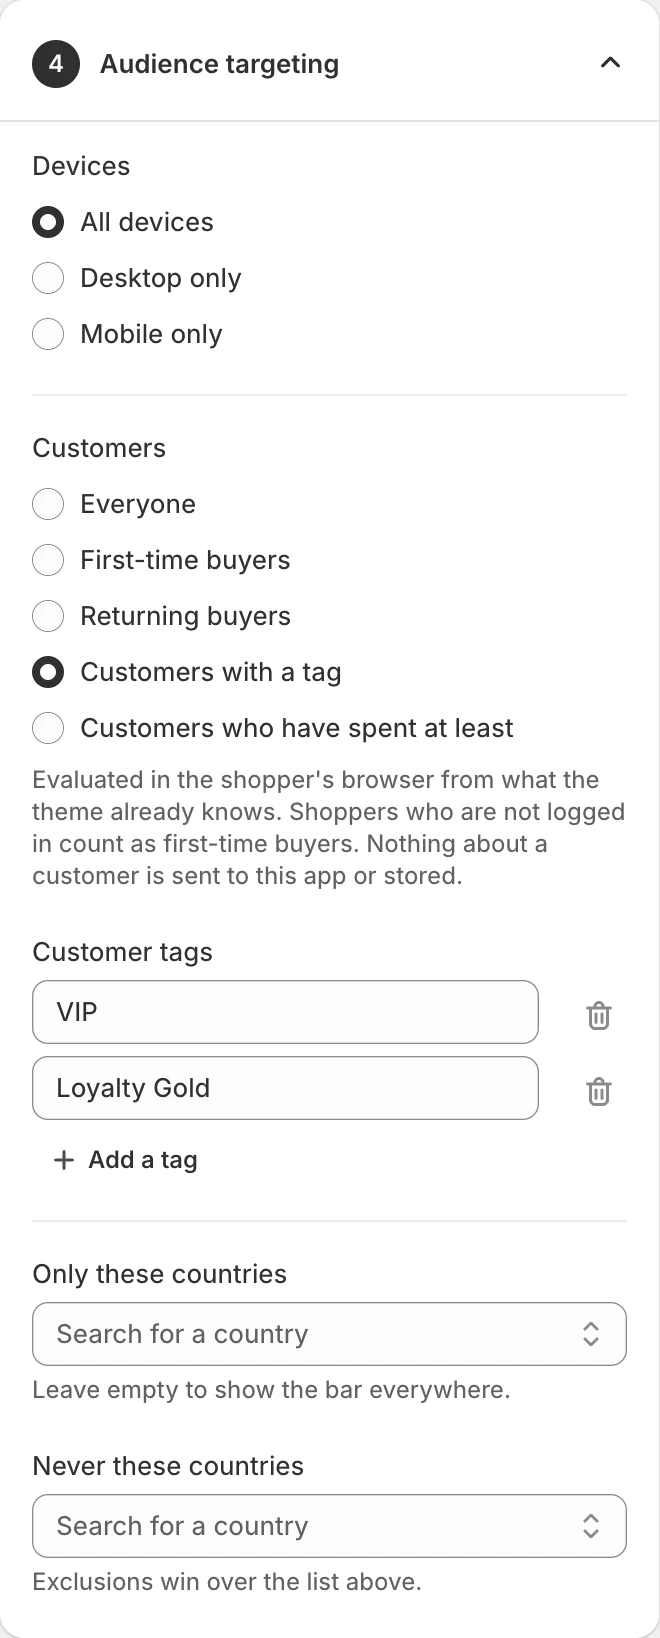
Visibility · card 4
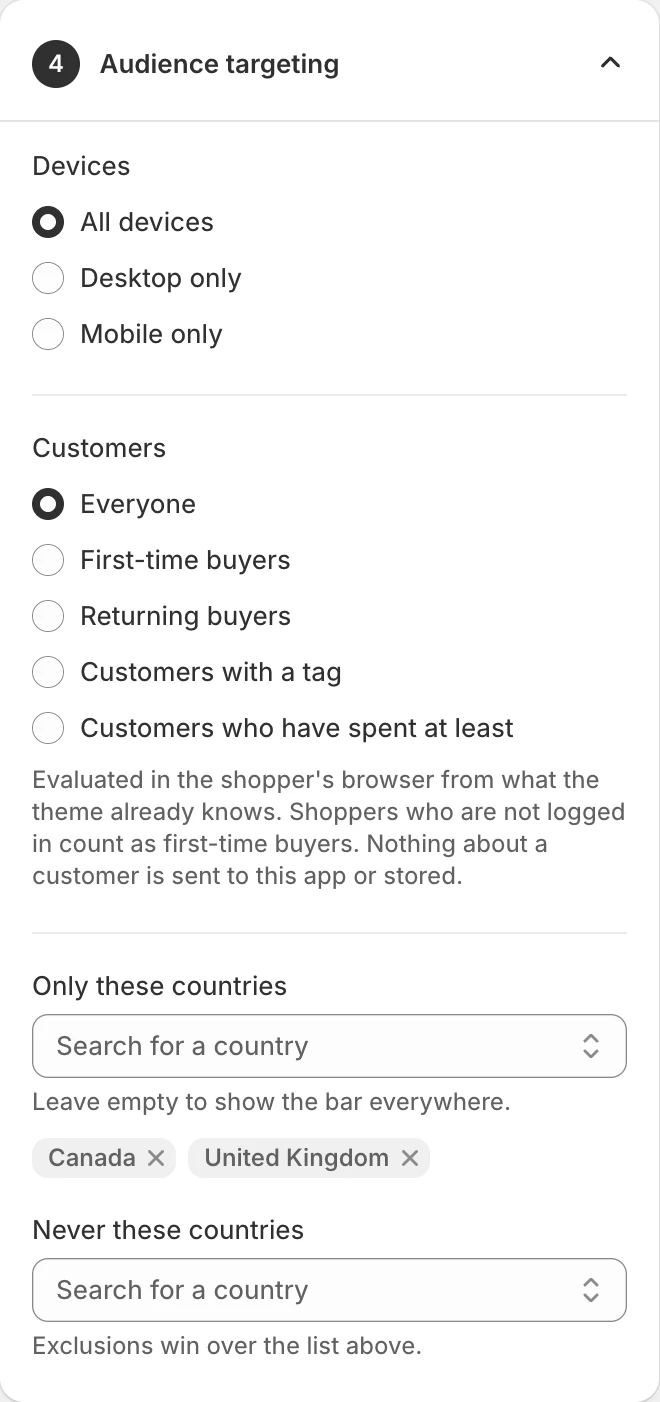
Audience targeting
- Devices
- All devices, desktop only, or mobile only.
- Customers
- Everyone, first-time buyers, returning buyers, customers with a tag you list, or customers who have spent at least an amount. Shoppers who are not logged in count as first-time buyers.
- Only these countries
- Show the bar only to shoppers in these countries. Empty means everywhere.
- Never these countries
- Hide it in these countries. This wins over the list above.
These rules are checked in the shopper's own browser. Nothing about a shopper is sent to us or stored.
Visibility · card 5
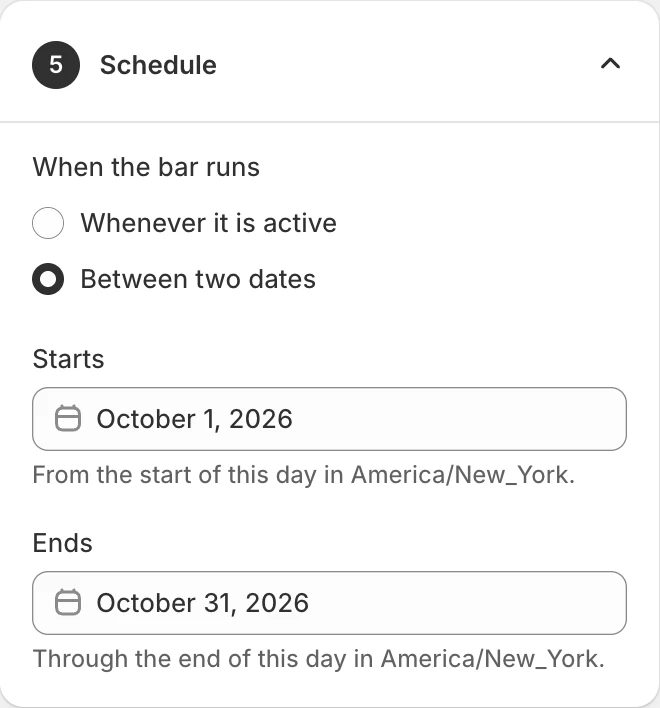
Schedule
- Whenever it is active
- The bar runs as long as it is switched on.
- Between two dates
- The bar appears from the start of the Starts day and stops at the end of the Ends day, in your store's timezone. It must still be Active.
Build a sale's bar in advance, set its dates, switch it to Active, and it appears and retires on its own.
Part 3
After setup
Go live and check
- Turn on Active in the General card, or use the switch in your bar list.
- Select Save. The bar is on your storefront straight away.
- Open your store, add something to the cart and watch the message change. It switches to your goal-reached message once the cart qualifies.
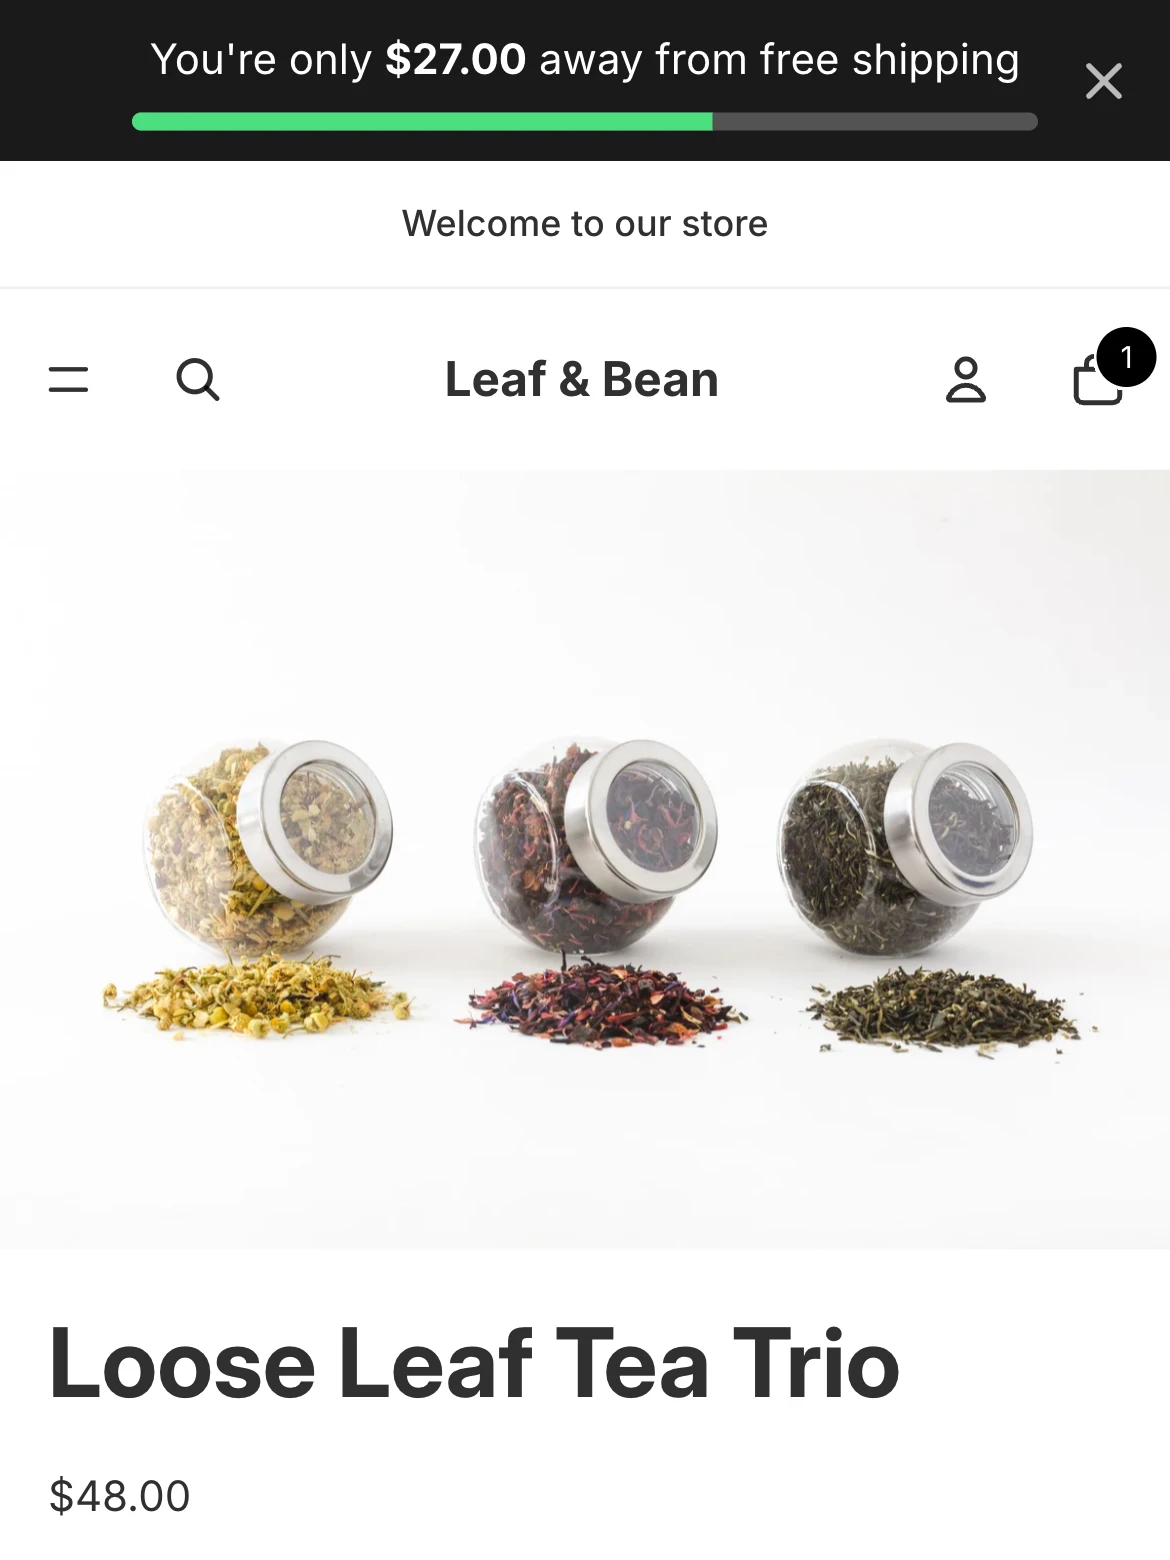
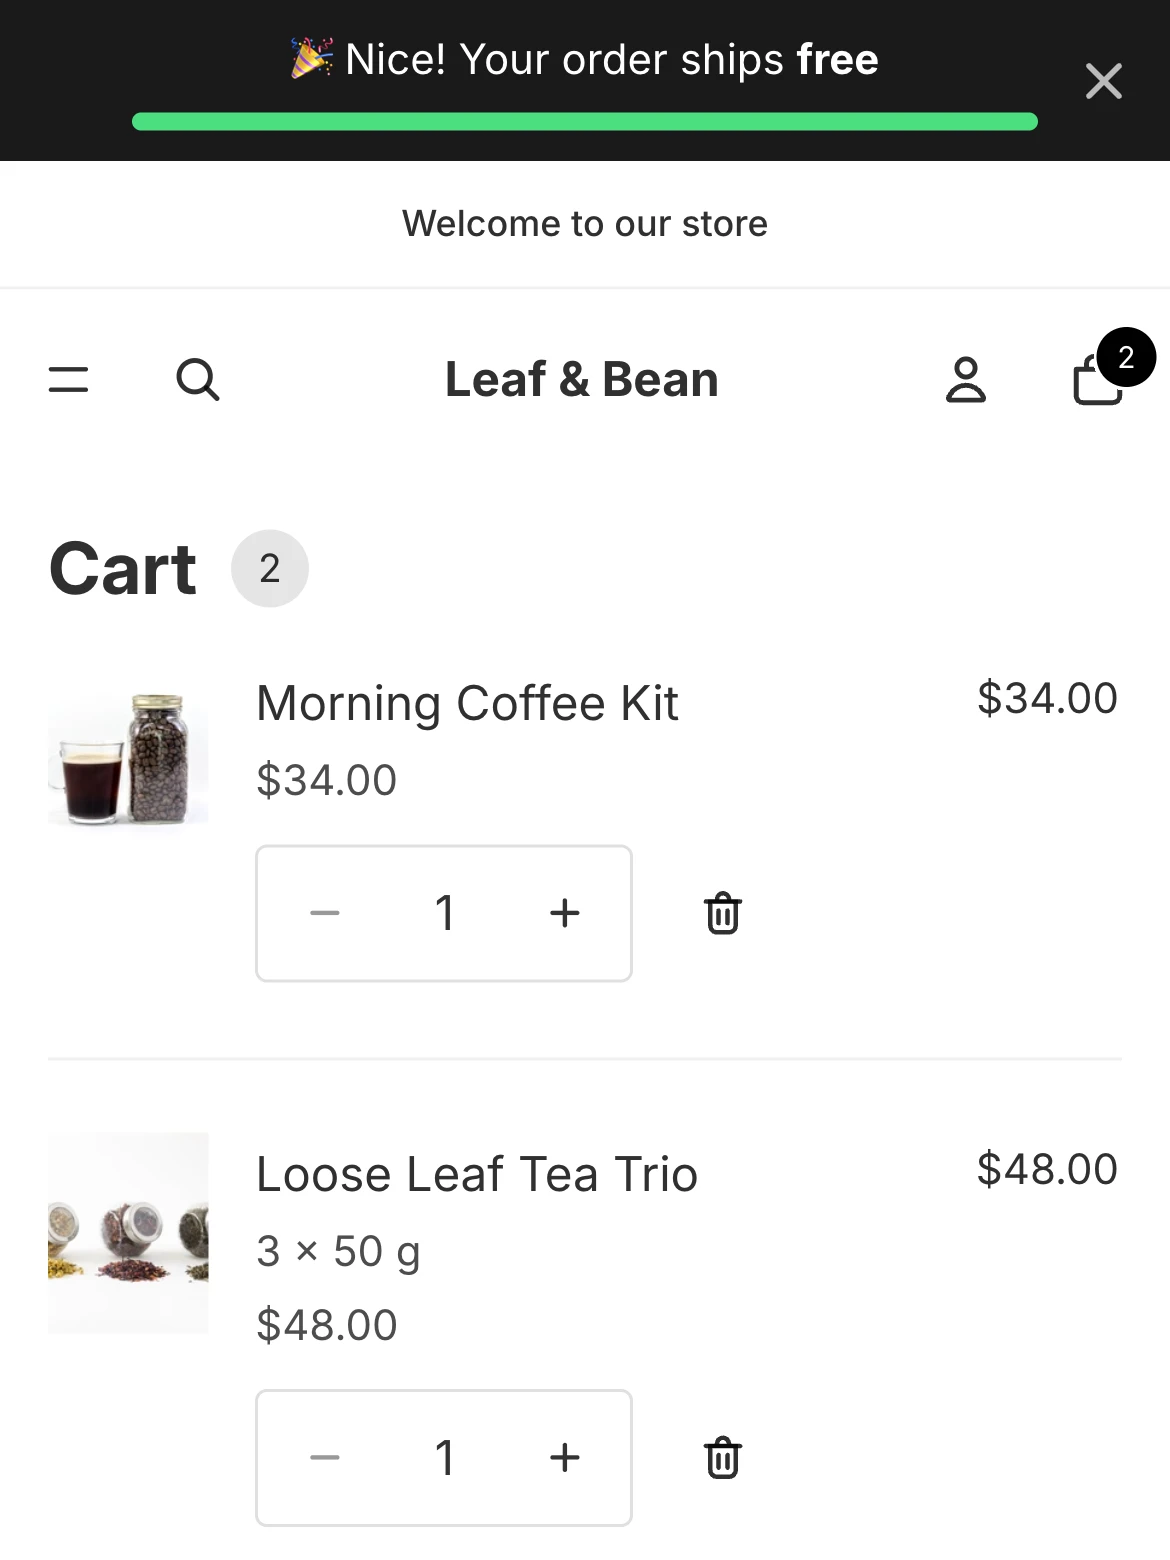
Nothing showing? Check, in order:
- the bar is Active, and today is inside its schedule;
- the app embed is on in the theme you are looking at;
- your own visit is not excluded by a page, device, customer, country or currency rule;
- you did not close the bar yourself earlier — try a private window.
Place a bar by hand
For a bar inside a page — say, above the cart or under a product's price — tick Manual placement, make the bar Active and save. Then:
- In your bar list, open the bar's ⋯ menu and select Add app block. The theme editor opens.
- Add the Free shipping bar (inline) block where you want it, and save.
- The block shows every bar set to manual placement. To show just one, turn off Show all manual bars and paste that bar's ID.
Older (vintage) themes have no app blocks. There the menu item is Place manual bar: it gives you a short snippet to paste into a Custom HTML section. Keep the app embed on either way — it loads the bar.
Manage your bars
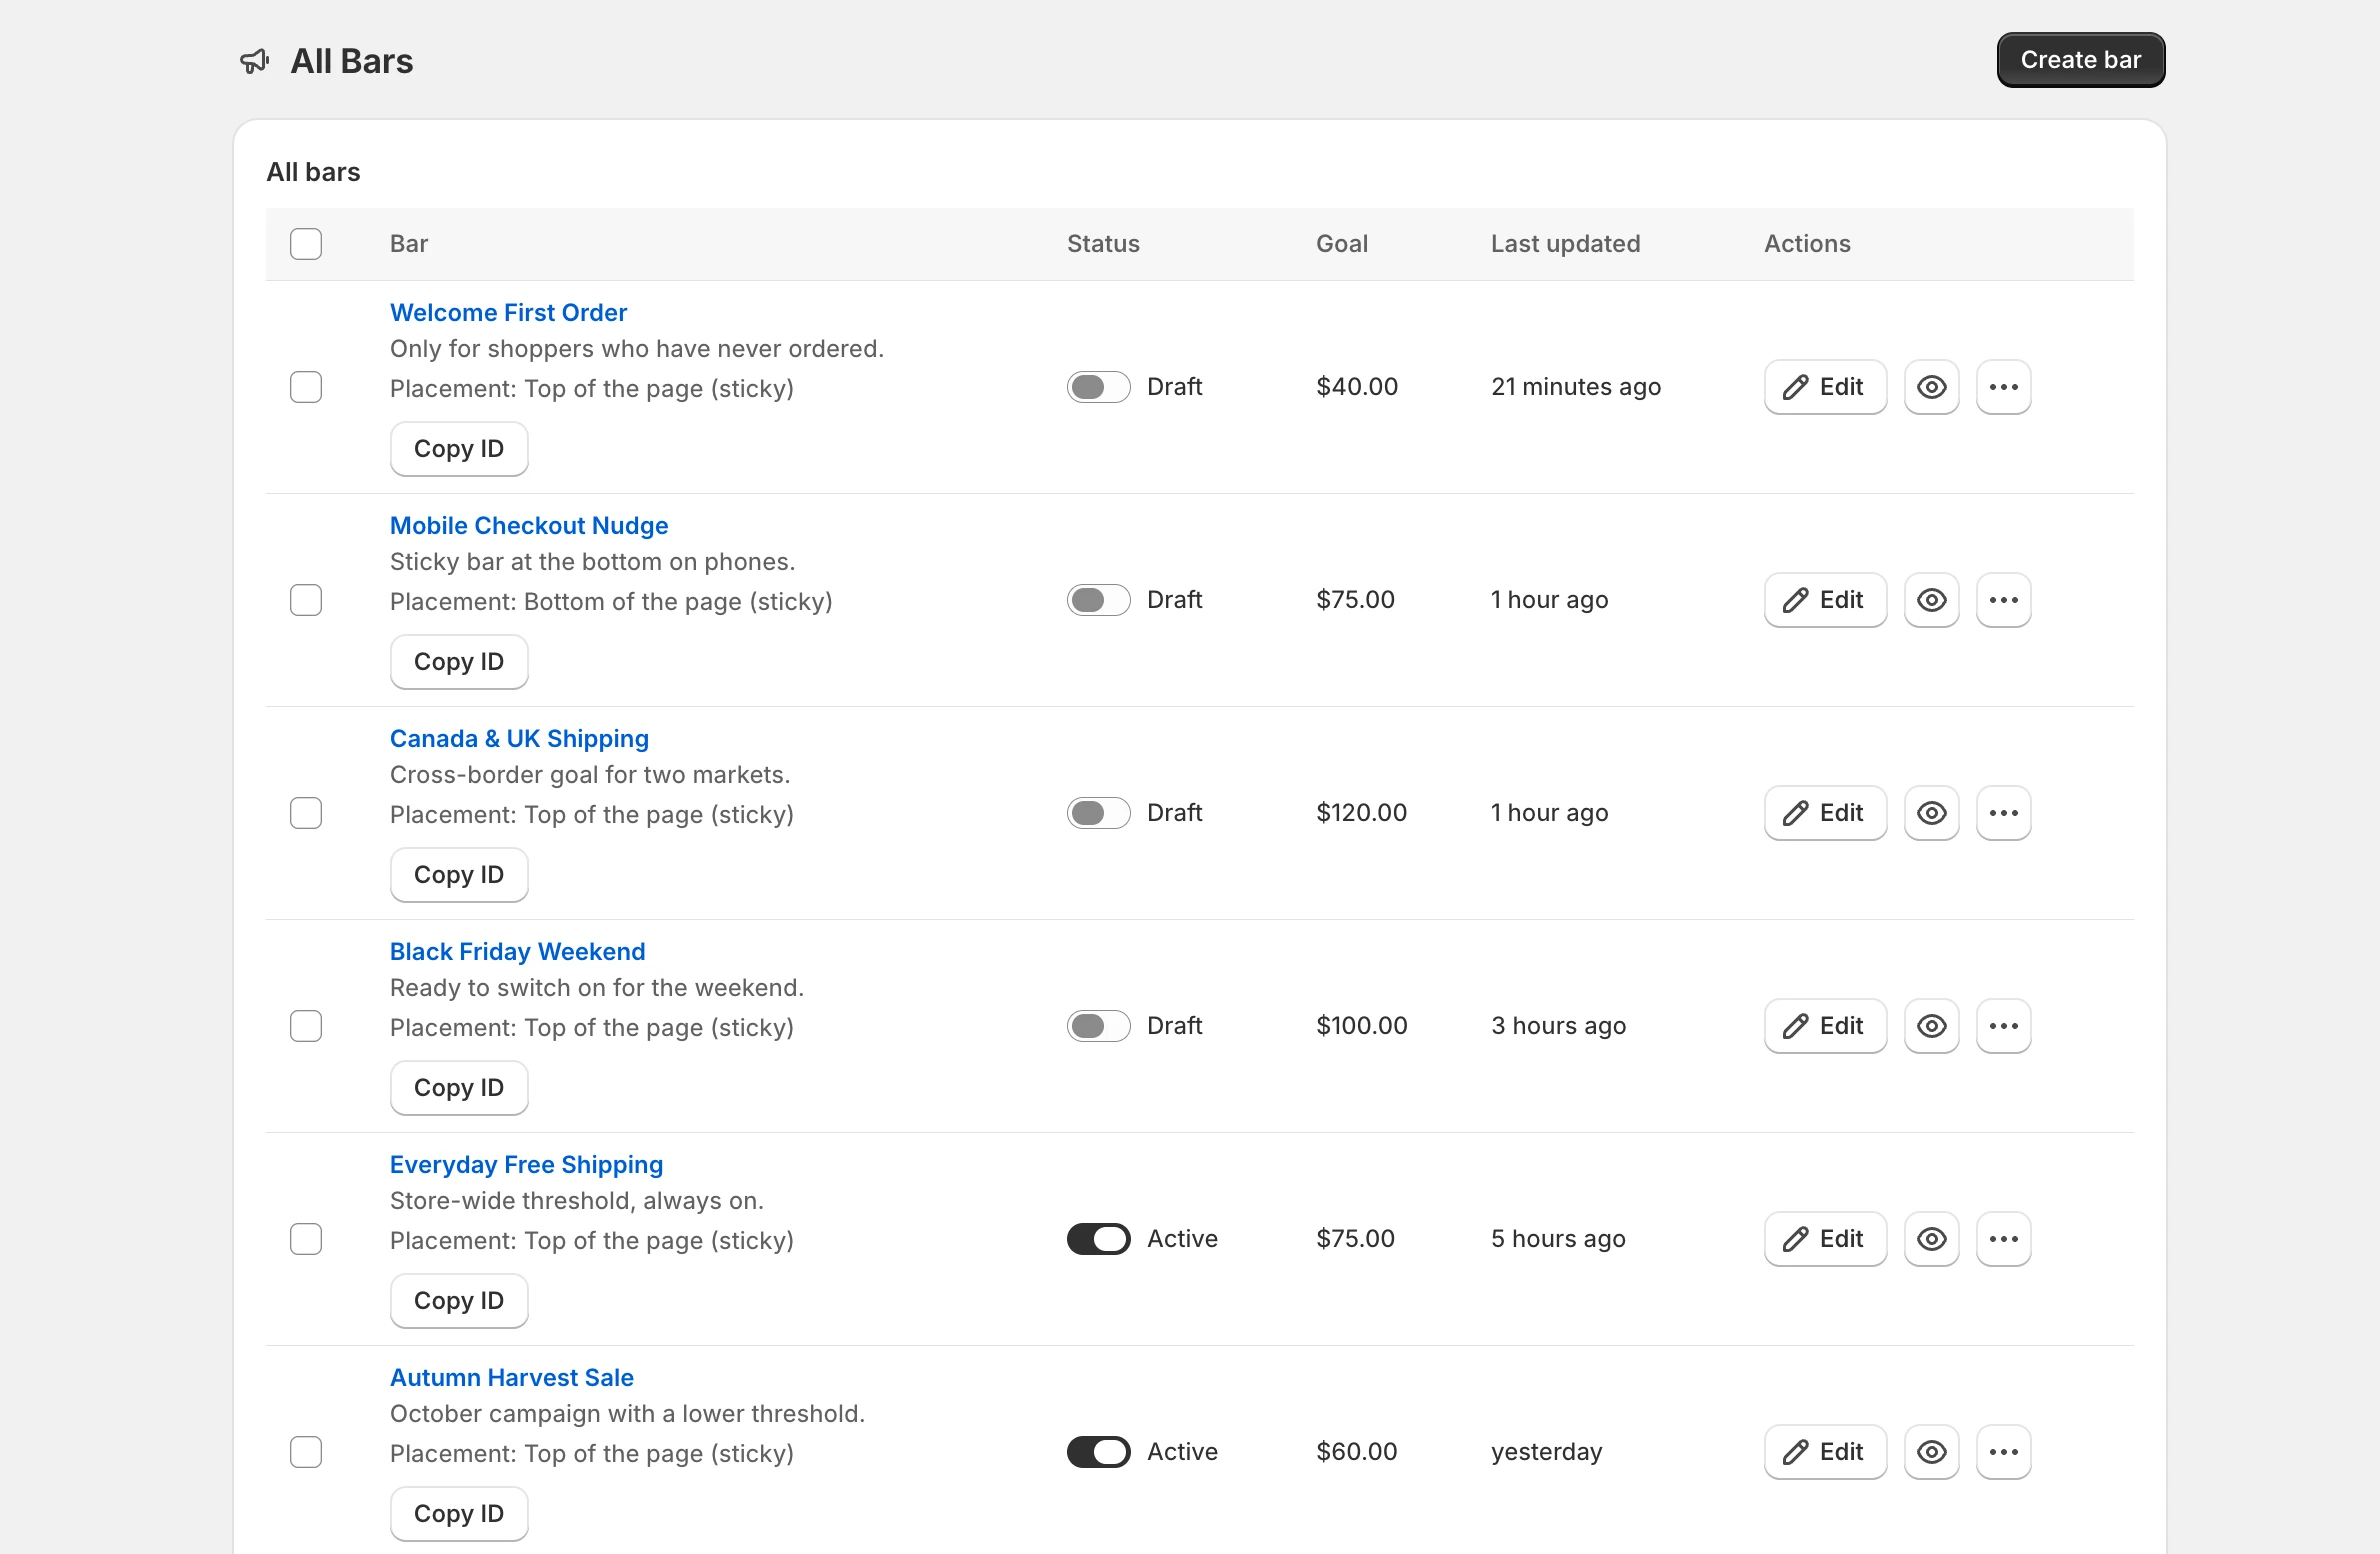
All Bars lists every bar with its status, goal, where it sits and when it last changed.
- The switch turns a bar on or off without opening it.
- Edit opens the editor; the eye icon previews the bar.
- The ⋯ menu copies the ID, adds an app block for manual bars, switches the bar on or off, or deletes it.
- Tick several bars to activate, deactivate or delete them together.
When more than one active bar matches a shopper, each one shows. Setting a bar back to Draft takes it off your store but keeps every setting.
Plans and billing
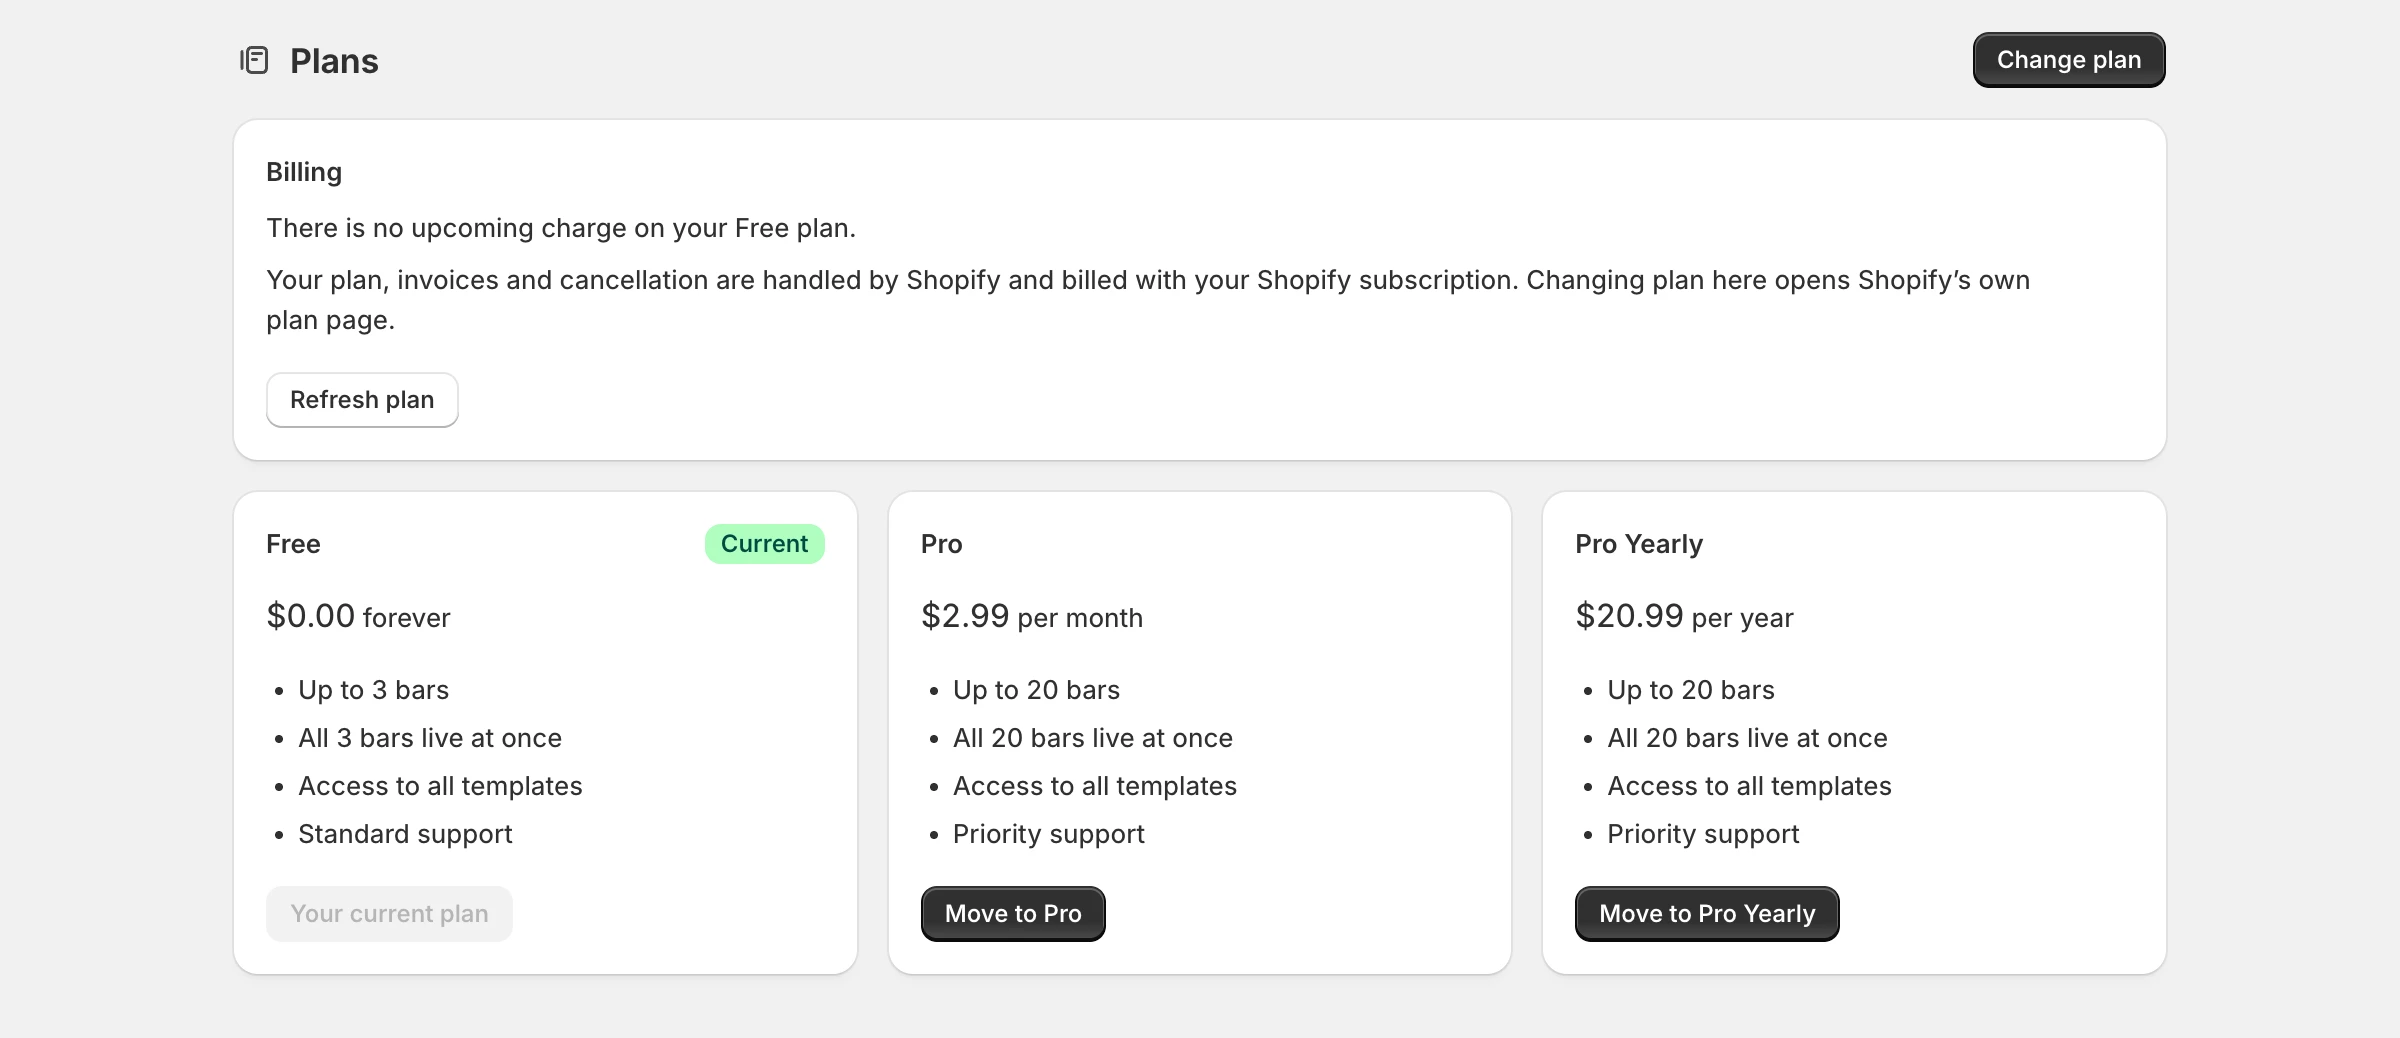
Plans shows your current plan and your next charge. Both plans include every feature and all ten designs; they differ only in how many bars you can hold.
- Free — up to 3 bars, all live at once. It does not expire.
- Pro — up to 20 bars, $2.99 a month or $20.99 a year.
Every bar counts toward the limit, draft or active. Select Change plan to switch on Shopify's own plan page; the charge appears on your Shopify invoice.
If you move to a plan with room for fewer bars than you have live, the extra bars are switched to draft — nothing is deleted — and the app tells you which ones.
Remove the app
To pause the bar, set it to Draft or switch the app embed off. To remove the app, uninstall it from Settings → Apps in your Shopify admin. The bar leaves your storefront immediately, and nothing is left in your theme files.
Your bars are kept for 48 hours in case you change your mind. After that, Shopify asks us to erase your store's data and we delete it all — see the privacy policy.
Still stuck? Support covers the problems people hit most often, and a message to us gets a reply from the people who wrote the app.
Give every cart something to reach for
Install Codofaz Shipping Bar, set your amount, and publish. The free plan does not expire, and nothing is charged unless you move to Pro.